使用 PowerShell 製作 Arduino/ESP TFT 圖檔資料
| | | 0 | |
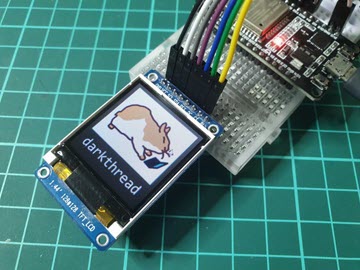
618 免運優惠失心瘋買了一堆 Arduino/ESP 零件,裡面有兩塊 TFT 彩色螢幕,想玩玩彩色顯示。
花了點時間,總算試出來在 TFT 顯示彩色圖片,做法是將圖檔轉成所謂的 RGB565 格式點陣資料,以 16 Bit 代表一個像素顏色(R、G、B 各佔 5、6、5 Bits,合計 16 Bits),寫成如下的 uint16_t 數字陣列:
const uint16_t bitmap[5120] PROGMEM = {
0x434e, 0x4bf0, 0x43d0, 0x43f1, 0x43f0, //...
0x9efc, 0xc75d, 0xaf3d, 0xc77e, 0xb73c, //...
將資料透過 SPI 介面寫入 TFT 螢幕,圖片便就在畫面上呈現。
第一次做,什麼都不懂,爬文照著教學(How to convert Bitmaps to uint_16t byte arrays for use with AdafruitGFX drawRGBBitmap)用開源軟體工具 LCD Image Converter 將 PNG 圖檔轉成上述數字陣列,摸索大半天,當圖案出現在郵票大螢幕的一刻,現在回想起來還有點激動,呵。
大家一定猜到了,性急如王藍田,我哪有耐性打開軟體工具點十幾下滑鼠只為了轉一個圖檔,這種沒營養的作業下個指令一秒完成才是王道呀!
研究了一下,驚喜發現 .NET Bitmap 類別本身就支援 System.Drawing.Imaging.PixelFormat.Format16bppRgb565,搭配之前剛溫習過的 LockBits()、BitmapData.Scan0 低階操作,理論上我能將任何圖檔轉成 RGB565 再匯出成 UInt16 陣列。
原本想寫個 C# Console Application,後來覺得用 PowerShell 會簡單點,參考網路文章再簡單推算位址搬搬資料(上週學到 Stride 為 4 倍數的知識馬上派上用場),一支可將任意圖檔轉成 RGB565 數字陣列的小工具就完成了。
程式中有些細節我還沒參透,像是 Graphics.DrawImage() 時有許多可調參數,如 SmoothingMode、CompositingQuality、PixelOffsetMode、InterpolationMode... 等等,功用效果如何我沒花時間研究;另外發現我的轉換結果,部分顏色會出現 Dither 抖動。例如某塊純色面積,LCD Image Converter 軟體轉出的是一整片相同顏色:
0x3983, 0x3983, 0x3983, 0x3983,
0x3983, 0x3983, 0x3983, 0x3983,
0x3983, 0x3983, 0x3983, 0x3983,
0x3983, 0x3983, 0x3983, 0x3983,
0x3983, 0x3983, 0x3983, 0x3983,
0x3983, 0x3983, 0x3983, 0x3983,
0x3983, 0x3983, 0x3983, 0x3983,
而我轉出來的是棋盤狀的微小差距顏色方格:
0x3983, 0x41a4, 0x3983, 0x41a4,
0x3983, 0x41a4, 0x3983, 0x41a4,
0x41a4, 0x3984, 0x41a4, 0x3984,
0x41a4, 0x3984, 0x41a4, 0x3984,
0x3983, 0x41a4, 0x3983, 0x41a4,
0x3983, 0x41a4, 0x3983, 0x41a4,
爬文似乎是色度降低演算過程常發生的現象,能否避免有待研究。但實際觀察,這個抖動現象倒不致破壞品質。影像處理這塊水很深,就容我先跳過吧!
完整程式範例如下:
param ([string]$imgPath)
$ErrorActionPreference = 'Stop'
Add-Type -AssemblyName System.Drawing
Add-Type -AssemblyName System.Runtime.InteropServices
if (!(Test-Path -PathType Leaf $imgPath)) {
    Write-Host "$imgPath not found" -ForegroundColor Red
    return
}
$src = [System.Drawing.Bitmap]::FromFile($imgPath)
$dst = New-Object System.Drawing.Bitmap -ArgumentList ([int]$src.Width, [int]$src.Height, [System.Drawing.Imaging.PixelFormat]::Format16bppRgb565)
$g = [System.Drawing.Graphics]::FromImage($dst)
# ref https://www.twblogs.net/a/5b8d0b1a2b7177188339c9a1
$g.SmoothingMode = [System.Drawing.Drawing2D.SmoothingMode]::HighQuality
$g.CompositingQuality = [System.Drawing.Drawing2D.CompositingQuality]::HighQuality
$g.PixelOffsetMode = [System.Drawing.Drawing2D.PixelOffsetMode]::HighQuality
$g.InterpolationMode = [System.Drawing.Drawing2D.InterpolationMode]::NearestNeighbor
$g.DrawImageUnscaled($src, 0, 0)
$g.Dispose()
$rect = New-Object System.Drawing.Rectangle(0, 0, $dst.Width, $dst.Height)
$bmd = $dst.LockBits($rect, [System.Drawing.Imaging.ImageLockMode]::ReadOnly, [System.Drawing.Imaging.PixelFormat]::Format16bppRgb565)
[byte[]]$raw = [System.Byte[]]::new($bmd.Stride * $dst.Height)
[System.Runtime.InteropServices.Marshal]::Copy($bmd.Scan0, $raw, 0, $raw.Length)
$dst.UnlockBits($bmd)
[byte[]]$data = [System.Byte[]]::new($dst.Width * $dst.Height * 2)
for ($y = 0; $y -lt $dst.Height; $y++) {
    [System.Buffer]::BlockCopy($raw, $y * $bmd.Stride, $data, $y * $dst.Width * 2, $dst.Width * 2)
}
$sb = New-Object System.Text.StringBuilder
$sb.AppendLine("const uint16_t bitmap[$($data.Length / 2)] PROGMEM = {") | Out-Null
[System.UInt16]$v = 0
for ($i = 0; $i -lt $data.Length / 2; $i ++) {
    $v = $data[$i * 2] + $data[$i * 2 + 1] * 256
    $sb.Append("0x$($v.ToString("x4"))") | Out-Null
    if ($i -lt $data.Length / 2 - 1) {
        $sb.Append(', ') | Out-Null
    }
    if ($i % ($dst.Width/2) -eq ($dst.Width/2 - 1)) {
        $sb.AppendLine("//0x$(($i * 2).ToString('X4'))") | Out-Null
    }
}
$sb.AppendLine() | Out-Null
$sb.AppendLine('};') | Out-Null
$sb.ToString()
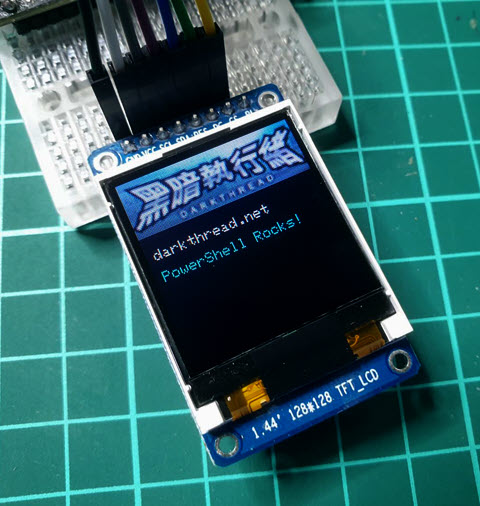
我用部落格 Logo 做實驗:
執行指令為 .\Convert-ImgToRgb565Array.ps1 logo.png | out-file "logo.h" -encoding utf8,記得要加 -encoding utf8 或 -encoding ascii,否則 PowerShell 的預設編碼為 Unicode,與 Arduino .c/.h 要求不相容。
一秒得到 .h,加入 Arduino 專案,圖檔就能在彩色螢幕上顯示囉~
PowerShell example to convert any image to RGB565 UInt16 array for Arduino TFT display.
Comments
Be the first to post a comment