Coding4Fun - 點陣中文字型之快速圖形化
 |  | 3 |  |  |
上週聊到中文點陣字型,年輕同學們可能沒啥感覺,但經歷過 DOS 時代的老人隔了幾十年後再摸到老東西,滿滿的回憶呀,感受格外強烈,本週就繼續在其中找樂子。
上回說到我沒找到明確授權且不是 GPL 的中文點陣字型(Open Source 沒問題,但真心不喜歡被 GPL 掐住脖子的感覺),我打算用思源黑體轉換成點陣字型以避開版權爭議,為準備後續大量批次作業,我先寫好一個將國喬、倚天字型 byte[] 資料轉中文字圖檔的小函式。
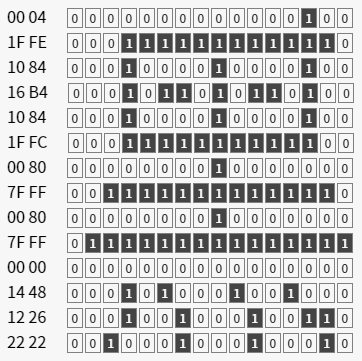
以國喬中文系統為例,普通中文字的尺寸是 16x14 點,在 16x16 字型檔 KCCHIN16.F00 會佔 28 個 Byte,例如「黑」這個字的字型資料是 00-04-1F-FE-10-84-16-B4-10-84-1F-FC-00-80-3F-FE-00-80-7F-FF-00-00-14-48-12-26-22-22,每一列為 2 Byte 共 16 Bit 記錄 16 個點是否塗色,共 14 列。若將這串數字稍加排列並轉成二進位,點陣資料的儲存原理就不難理解了。

註:以上的示意圖是用 JavaScript 寫的,這陣子較少碰前端,我刻意寫成網頁維持手感:線上版
<!DOCTYPE html>
<html>
<head>
  <meta charset="utf-8">
  <meta name="viewport" content="width=device-width">
  <title>中文 16x16 點陣字範例</title>
  <style>
    .z { margin-left: 16px; font-size: 9pt; }
    .z > span {
      display: inline-block; width: 14px;
      border: 1px solid gray;
      text-align: center; margin: 1px;
    }
    .z .v1 {
      color: white; background-color: #444;
    }
  </style>
</head>
<body>
  <div id=display></div>
  <script>
    var hex = '00-04-1F-FE-10-84-16-B4-10-84-1F-FC-00-80-3F-FE-00-80-7F-FF-00-00-14-48-12-26-22-22';
    var a = hex.split('-');
    var h = [];
    function toBin(v) {
      v = parseInt(v, 16);
      for (var j = 0; j < 8; j++) {
        var d = ((v << j) & 0x80) > 0 ? '1' : '0';
        h.push('<span class=v' + d + '>' + d + '</span>');
      }
    }
    for (var i = 0; i < a.length / 2; i++) {
      var o = i * 2;
      h.push('<div>' + a[o] + ' ' + a[o + 1] + '<span class=z>');
      toBin(a[o]);
      toBin(a[o + 1]);
      h.push('</span></div>');
    }
    document.getElementById('display').innerHTML = h.join('');
  </script>
</body>
</html>
按照這個原理,要將 byte[28] 轉成圖形,最直覺的做法是建一個 16x16 的 Bitmap,x 由 0 到 16,y 由 0 到 14,依據各位元是 1 是 0 將對映像素設成黑色或白色,例如:
public byte[] GetCharPng(char ch)
{
    var cd = new CharData(ch);
    var fontData = ReadFont(ch);
    var bmp = new Bitmap(cd.Category == CharCategories.Ascii ? 8 : 16, 16);
    var h = cd.Category == CharCategories.Symbol ? 16 : (cd.Category == CharCategories.Chinese ? 14 : 15);
    var w = cd.Category == CharCategories.Ascii ? 8 : 16;
    var offset = 0;
    for (var y = 0; y < h; y++)
    {
        var b = fontData[offset];
        for (var x = 0; x < w; x++)
        {
            if ((b & 0x80) != 0)
                bmp.SetPixel(x, y, Color.Black);
            if (w > 8 && x == 7)
                b = fontData[++offset];
            else
                b = (byte)(b << 1);
        }
        offset++;
    }
    using (var ms = new MemoryStream())
    {
        bmp.Save(ms, ImageFormat.Png);
        return ms.ToArray();
    }
}
以「黑」為例,這個 16x16 的 PNG 檔,大小為 192 Bytes,若 13195 個中文 + 765 個全形英數字符號,總大小應不超過 3MB(每個字的圖檔會因壓縮大小不一)。
但想想這個方法不算太有效率,.NET 的 Bitmap 圖檔型別支援 PixelFormat.Format1bppIndexed 格式,當顏色深度為 1,系統會用一個位元記錄黑白,儲存格式跟中文字型檔的原生格式相同,代表我們可以將其直接複製到 Bitmap 內部,以 Byte 為單位,取代一個一個像素設定。針對這種低階資料作業,Bitmap 提供了 LockBits()、BitmapData.Scan0 等 API,允許開發人員藉由低階資料存取提升圖形運算速度。之前我用過它展示 Unsafe 的威力(延伸閱讀:Unsafe, But Fast!),這次的情境也非常適合靠它加速,除了將字型資料圖形化,未來向量字點陣字時,會先顯示成圖形再轉成相容的 byte[] 格式,亦可用相同技巧取代 GetPixel() 一點一點掃瞄,速度可望大幅提升。
廢話不多說,直接上 Code:
public byte[] GetCharBmp(char ch)
{
    var cd = new CharData(ch);
    var fontData = ReadFont(ch);
    var w = cd.Category == CharCategories.Ascii ? 8 : 16;
    var fontDataStride = w / 8;
    var h = 16;
    var bmp = new Bitmap(w, h, PixelFormat.Format1bppIndexed);
    var bmd = bmp.LockBits(new Rectangle(0, 0, w, h), ImageLockMode.Read, PixelFormat.Format1bppIndexed);
    var idx = 0;
    unsafe
    {
        byte* p = (byte*)bmd.Scan0;
        for (var y = 0; y<h; y++)
        {
            for (var s = 0; s < bmd.Stride; s++)
            {
                if (s < fontDataStride && idx < fontData.Length)
                {
                    p[0] = fontData[idx++];
                }
                p++;
            }
        }
    }
    bmp.UnlockBits(bmd);
    using (var ms = new MemoryStream())
    {
        bmp.Save(ms, ImageFormat.Bmp);
        return ms.ToArray();
    }
}
實際動手寫才會發現眉角,例如:BitmapData 有個 Stride 屬性,代表一列像素要用多少個 Byte 儲存,依直覺 16 點用兩個 Byte 就夠了。但實際上它會以 4 為單位遞增(可能要湊 32 Bits 與 CPU、暫存器的運算單位一致吧),不足 4 時以 4 計,官方說明有提到這點(如下),所以在複製資料時,每兩個 Byte 之後再跳過兩個 Byte,不是連續寫入。
The stride is the width of a single row of pixels (a scan line), rounded up to a four-byte boundary.
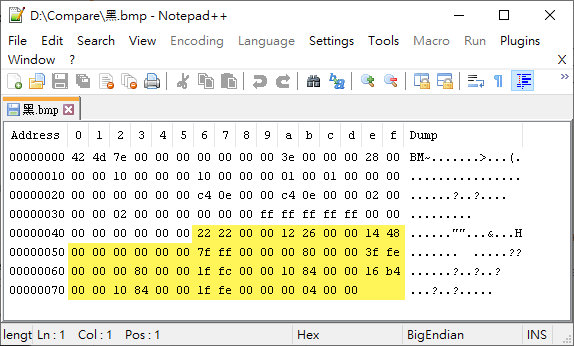
而存成 .bmp 檔時,每一列像素也是用 4 Bytes,加上 .bmp 檔的標頭,16x16 的黑白兩色圖檔大小為 126 Bytes,比 .png 小。

接下來跑個 Benchmark,用一小段程式對範例字串逐字元呼叫 GetCharPng() 及 GetCharBmp() 1000 次:
public IActionResult OnGet()
{
    var sw = new Stopwatch();
    var s = "我達達的馬蹄是美麗的錯誤";
    var ary = s.ToCharArray();
    int times = 1000;
    for (int j = 0; j < 3; j++)
    {
        sw.Restart();
        for (var i = 0; i < times; i++)
            s.ToCharArray().Select(ch => kcfa.GetCharPng(ch)).ToList();
        sw.Stop();
        Debug.WriteLine($"PNG: {sw.ElapsedTicks:n0}");
        sw.Restart();
        for (var i = 0; i < times; i++)
            s.ToCharArray().Select(ch => kcfa.GetCharBmp(ch)).ToList();
        sw.Stop();
        Debug.WriteLine($"BMP: {sw.ElapsedTicks:n0}");
    }
    return Content("OK");
}
數據顯示,GetCharBmp() 比 GetCharPng() 快了三倍多,但領先幅度不如預期大。
PNG: 25,683,409
BMP: 7,291,316
PNG: 25,021,673
BMP: 7,334,556
PNG: 24,495,296
BMP: 7,004,444
由 Visual Studio 2019 Diagnostic Tools 的效能圖表,SetPixel() 不意外榜上有名,但發現 Bitmap 建構式與 Save() 也挺耗 CPU,Save() 無法避免,但採用低階指令複製 byte[],Bitmap 物件應可以共用。

於是我再改寫一版,預先建好半形及全形用兩個 Bitmap 靜態變數,之後直接共用不要每次重建(考慮可能多緒執行,宜加 lock 保護):
static Bitmap Bmp4Ascii = new Bitmap(8, 16, PixelFormat.Format1bppIndexed);
static Bitmap Bmp4Chinese = new Bitmap(16, 16, PixelFormat.Format1bppIndexed);

public byte[] GetCharBmp(char ch)
{
    var cd = new CharData(ch);
    var fontData = ReadFont(ch);
    var w = cd.Category == CharCategories.Ascii ? 8 : 16;
    var fontDataStride = w / 8;
    var h = 16;
    var bmp = cd.Category == CharCategories.Ascii ? Bmp4Ascii : Bmp4Chinese;
    lock (bmp)
    {
        var bmd = bmp.LockBits(new Rectangle(0, 0, w, h), ImageLockMode.ReadWrite, PixelFormat.Format1bppIndexed);
        var idx = 0;
        unsafe
        {
            byte* p = (byte*)bmd.Scan0;
            for (var y = 0; y < h; y++)
            {
                for (var s = 0; s < bmd.Stride; s++)
                {
                    if (s < fontDataStride && idx < fontData.Length)
                    {
                        p[0] = fontData[idx++];
                    }
                    p++;
                }
            }
        }
        bmp.UnlockBits(bmd);
        using (var ms = new MemoryStream())
        {
            bmp.Save(ms, ImageFormat.Bmp);
            return ms.ToArray();
        }
    }
}
由實測結果,這項調整有抓到重點,Bitmap 產生時間再縮短一半:
PNG: 25,782,349
BMP: 3,352,245
PNG: 24,865,341
BMP: 3,334,074
PNG: 24,673,937
BMP: 3,479,733
若還想再加速,還有一些調整手法,例如:省下迴圈直接寫死 p[0] = fontData[0]; p[1] = fontData[1]; p[4] = fontData[2]; p[5] = fontData[3]...,但這類技巧要犠牲可讀性及可維護性,代價偏高。這次處理量不過一萬多筆,直覺不必搞到太極端,未來等真有需要再改也不遲。
今天的 Coding4Fun 練習了 JavaScript、Bitmap 低階操作、unsafe 及簡單效能調校,收獲滿滿,Coding 樂無窮~
Example of how to convert dot matrix byte array data to Bitmap efficiently with .NET and some performance tips.
Comments
# by CY
好帥啊阿
# by joker
偶像!!
# by RGM-79[G]
看不懂真的是無字天書.......只能服了......