微軟 Go 語言手把手教學小記
| | | 3 | |
意外發現微軟居然有 Go 語言的線上教學:使用 Go 邁出您的第一步。
之前上過微軟的 Python 新手教學、Vue 新手教學,Go 是我看好值得一學的程式語言(參考:Let's Go! 認識 Go 語言),既然微軟也出了手把手 Go 教學,不走過一回說不過去。
課程預估時間 5 小時 30 分,我有一點點基礎,全部看完兼做筆記,大概就一個週末的時間。
以下是重點摘要整理(從我的角度,C# 老開發者,也會一點 JavaScript)。
註:教學中文翻譯存在一些錯誤,像是 Dictionary 的 Key 被翻成機碼、how to log in Go 被翻成如何登入 Go (不過原文本身就是雙關語啦 XD)... 但還算瑕不掩瑜,有疑問快參照原文。(能嗅出翻譯錯誤,也代表有弄懂啦)
特色
跨平台(Linux/macOS/Windows)、大量用於伺服器端和雲端軟體開發(如 Docker、K8S、區塊鏈)、強調平行運算、在 StackOverflow 調查深受開發者歡迎。
Go 跟 C 很像,跟 Java/C#/Python 也有相似之處,但力求降低複雜度,有用到物件導向概念但未完全實作物件導向。Go 100% 開源,具備 GC,標準程式庫完整,不依賴第三方程式庫便能完成許多應用程式。
安裝及遊樂區
安裝沒啥好說,跳過。若沒其他特別考量,開發工具首推 VSCode,配上 Github Copilot 助你手起刀落大殺四方。
Go 官方有遊樂場 https://go.dev/play/,網上版編譯執行環境,簡單程式可貼上執行,直接看結果。
工作區
預設工作區位置由環境變數 GOPATH 決定,預設為 $HOME/go,可用 go env GOPATH 確認。
在特定專案開發時,可用 [Environment]::SetEnvironmentVariable("GOPATH", "<project-folder>", "User") 設定(需重開 Cmd/PowerShell 生效),工作區主要有三個子目錄: bin、src、pkg (程式庫的已編譯版本,可直接連結不需重新編譯),如下例:
bin/
    hello
    coolapp
pkg/
    github.com/gorilla/
        mux.a
src/
    github.com/golang/example/
        .git/
    hello/
        hello.go
Hello, World
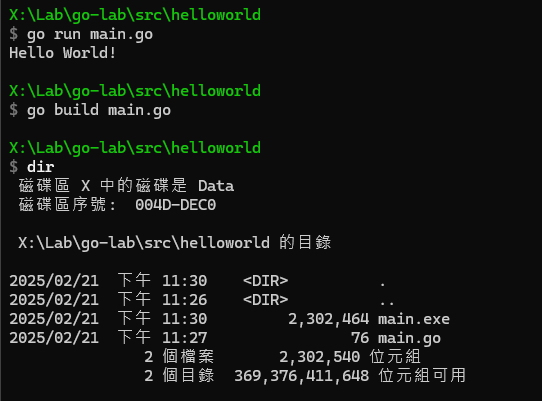
第一個練習先不用 VSCode,文字編輯器搞定。go run main.go 直接執行,go bulid main.go 會在同目錄編譯出可執行檔(Windows 下為 main.exe,大小約 2MB,不需額外 dll 或 Runtime)。
package main

import "fmt"

func main() {
    fmt.Println("Hello World!")
}
變數、常數
直接看 Code
// 一般
var firstName, lastName string
var age int
// 區塊
var (
    firstName, lastName string
    age int
)
// 含初始化
var (
    firstName string = "John"
    lastName  string = "Doe"
    age       int    = 32
)
// 自動推斷型別
var (
    firstName = "John"
    lastName  = "Doe"
    age       = 32
)
// 簡化版
var (
    firstName, lastName, age = "John", "Doe", 32
)
// 用 := 符號 (限函式內使用,函式外一律用 var)
firstName, lastName := "John", "Doe"
age := 32
// 常數
const HTTPStatusOK = 200
const (
    StatusOK              = 0
    StatusConnectionReset = 1
    StatusOtherError      = 2
)
變數宣告了一定要使用,不然編譯會出錯。
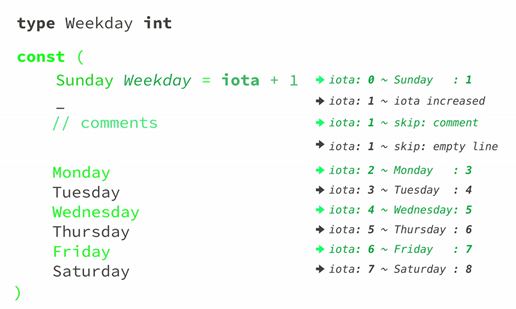
常數可用 Iota 自動跳號(類似 C# Enum 對應數字):
基本資料型別
整數共有 int8、int16、int32 和 int64,32 位元作業系統的 int 是 int32,64 位元則為 int64。另有 uint、uint8、uint16、uint32、uint64。 rune 是 int32 的別名,可用來表示字元,例如:rune := 'G'。
注意:Go 在整數運算時不會自動轉型,故以下會出錯:
var integer16 int16 = 127
var integer32 int32 = 32767
fmt.Println(integer16 + integer32) // invalid operation: integer16 + integer32 (mismatched types int16 and int32)
// 正確做法
fmt.Println(int32(integer16) + integer32)
Go 的浮點數有 float32 和 float64,math.MaxFloat32 和 math.MaxFloat64 常數可用來檢查上下限。指定值時可用科學記號如 const Avogadro = 6.02214129e23。
布林值跟字串使用上跟 C#/JavaScript 差不多。
數字與字串轉換可用 strconv.Atoi("-42")、strconv.Itoa(-42)。
這裡順便提 Go 的一項特色:Go 很重視錯誤處理,如 Atoi() 需考慮字串不是數字無法轉換的情況,故除數字外,需另外接收 Error 檢查是否出錯,標準寫法如下。
i, err := strconv.Atoi(someString)
if err != nil {
	fmt.Println("Error:", err)
	return
}
// 若程式可容忍出錯狀況,可用 _ 接收 Error 並忽略
i, _ := strconv.Atoi(mustBeNumber)
函式
Go 的 main() 不像 C# 有 string[] args 接輸入參數,需透過 os.Args[n] 存取。
自訂函式回傳值寫法如下:
func calc(number1 string, number2 string) (sum int, mul int) {
    int1, _ := strconv.Atoi(number1)
    int2, _ := strconv.Atoi(number2)
    sum = int1 + int2
    mul = int1 * int2
    return
}
Go 也支援參數傳址,語法為傳輸時加 &,呼叫應用時加 * (這點跟 C 很像):
package main

import "fmt"

func main() {
    firstName := "John"
    updateName(&firstName)
    fmt.Println(firstName)
}

func updateName(name *string) {
    *name = "David"
}
套件
目前為止,我們寫的程式都在 package main 下,會編譯成可執行檔(Windows 下為 .exe)。隨著專案複雜,功能多半放在不同套件以方便管理及應用。
拆分套件的做法是在 src 下建子目錄(以 $GOPATH/src/calculator 為例)放套件相關程式 .go 檔,並在該目錄下執行 go mod init github.com/myuser/calculator。執行後會得到 go.mod,內容如下,主要是定義模組名稱:
module github.com/myuser/calculator

go 1.14
Go 沒有 public / private 關鍵字,而是依名稱大小寫起始決定公用或私用。下例中,只有 Version/Sum() 對外公開:
package calculator

var logMessage = "[LOG]"

// Version of the calculator
var Version = "1.0"

func internalSum(number int) int {
    return number - 1
}

// Sum two integer numbers
func Sum(number1, number2 int) int {
    return number1 + number2
}
要呼叫 calculator 套件,main.go 寫法如下:
package main

import (
  "fmt"
  "github.com/myuser/calculator"
)

func main() {
    total := calculator.Sum(3, 5)
    fmt.Println(total)
    fmt.Println("Version: ", calculator.Version)
}
下一步工作是在 helloworld 目錄下也執行 go mod init helloworld 建立 go.mod 檔,並加入參照資料:
module helloworld

go 1.14

require github.com/myuser/calculator v0.0.0

replace github.com/myuser/calculator => ../calculator
https://pkg.go.dev/ 相當於 Go 世界的 NuGet 伺服器,若要引用上面的套件可在 import 區加入名稱,執行 go mod tidy 自動更新 go.mod。
if/else/switch
Go 的 if 條件式不需要括弧,成立或不成立區塊的大括弧不可省略,且沒有三元 if 表示法 a ? b : c(登楞!!)
一個特殊用法是在條件式可宣告變數,該變數僅在 if 區塊範圍內可用:
package main

import "fmt"

func somenumber() int {
    return -7
}
func main() {
    if num := somenumber(); num < 0 {
        fmt.Println(num, "is negative")
    } else if num < 10 {
        fmt.Println(num, "has 1 digit")
    } else {
        fmt.Println(num, "has multiple digits")
    }

    fmt.Println(num) // 會出錯,在 if 區塊外無法使用
}
Go 的 switch 跟 C#/JavaScript 相似,但不需要寫 break:
package main

import (
    "fmt"
    "math/rand"
    "time"
)

func main() {
    sec := time.Now().Unix()
    rand.Seed(sec)
    i := rand.Int31n(10)

    switch i {
    case 0:
        fmt.Print("zero...")
    case 1:
        fmt.Print("one...")
    case 2:
        fmt.Print("two...")
    case 4,5:
        fmt.Print("four or five...")
    default:
        fmt.Print("no match...")
    }

    fmt.Println("ok")
}
一個特殊之處在於 Go switch 的 case 可以呼叫函式驗證 true/false,或使用條件式,若要貫穿接著跑下一個可用 fallthrough 關鍵字:
func main() {

    rand.Seed(time.Now().Unix())
    r := rand.Float64()
    switch {
    case r > 0.1: // 效果類似 if .. else,但可讀性更好
        fmt.Println("Common case, 90% of the time")
    default:
        fmt.Println("10% of the time")
    }

    switch num := 15; {
    case num < 50:
        fmt.Printf("%d is less than 50\n", num)
        fallthrough // 想成原本有隱藏的 break,加上 fallthrough 把它拿掉
    case num < 100:
        fmt.Printf("%d is less than 100\n", num)
        fallthrough
    case num < 200:
        fmt.Printf("%d is less than 200", num)
    }
}
for 迴圈
Go 的 for 可以當 while 用,直接來幾個範例:
// 標準型
for i := 1; i <= 100; i++ {
    sum += i
}

// 沒有 prestatement 及 poststatement,類似 while
for num != 5 {
    num = rand.Int63n(15)
    fmt.Println(num)
}

// while (true) + break
for {
    fmt.Print("Writing inside the loop...")
    if num = rand.Int31n(10); num == 5 {
        fmt.Println("finish!")
        break
    }
    fmt.Println(num)
}

// continue 範例就不寫了
defer/panic/recover
defer 有點特別,可以將動作 Push 進某個 Stack,區塊結束前再一一 Pop 出來執行:
func main() {
    for i := 1; i <= 3; i++ {
        defer fmt.Println("deferred", -i)
        fmt.Println("regular", i)
    }
}
/* 會得到
regular 1
regular 2
regular 3
deferred -3
deferred -2
deferred -1
*/
最常見應用是用完檔案後關閉檔案,這在 C# 是靠 using 完成,在 Go 靠 defer:
func main() {
    newfile, error := os.Create("learnGo.txt")
    if error != nil {
        fmt.Println("Error: Could not create file.")
        return
    }
    defer newfile.Close()

    if _, error = io.WriteString(newfile, "Learning Go!"); error != nil {
	    fmt.Println("Error: Could not write to file.")
        return
    }

    newfile.Sync()
}
panic 相當於 C# 的 throw。panic 會中止程式,但 defer 安排的動作仍會逐一完成。
package main

import (
	"fmt"
)

func double(value int) {
	fmt.Println("process: ", value)
	if value > 4 {
		panic("Reach limit [8]!")
	}
	defer fmt.Println("deferred: ", value)
	double(value * 2)
}

func main() {
	double(2)
	fmt.Println("Done") // 程式不會正常結束,這行永遠不會執行
}
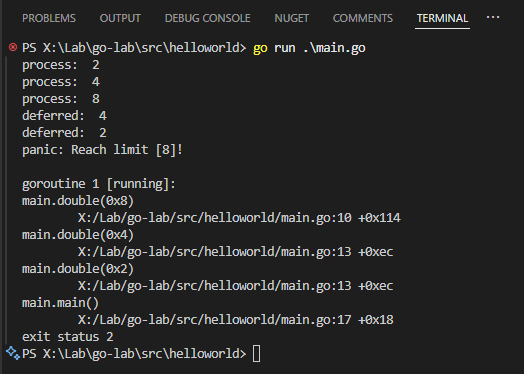
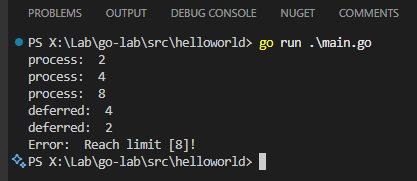
recover() 可以吃下錯誤,加入自訂邏輯,但方便性跟 try ... catch 有一大段差距。2019 年有人提議為 Go 加入 try,但最終因為不符合 Go 強調明確、簡單和直觀的錯誤處理思維,這個語法糖提議被否決了。
無論如何,看一下 recover() 怎麼用:
func main() {
	// 在 main() 結束時跳出來善後
	defer func() {
		// 若發生 panic,則 recover() 會回傳 panic 的值
		handler := recover()
		if handler != nil {
			fmt.Println("Error: ", handler)
		}
	}()

	double(2)
	fmt.Println("Done")
}
陣列
Go 的陣列大小固定,宣告後增減元素,實務上不太常用。Go 陣列也是用方括號,但與其他語言不同,[] 放在前面。
cities := [5]string{"New York", "Paris", "Berlin", "Madrid"}
// 陣列長度以省略符號「...」取代,讓編譯器自己數
q := [...]int{1, 2, 3}
// 只指定最後一筆的位置跟值,下例為 100 筆 len(numbers) == 100
numbers := [...]int{99: -1}
// 二維陣列
var twoD [3][5]int
// twoD[i] 是一個 [5]int
Slice 在教學中被翻成「配量」,聽起來很怪(比較常見的翻譯是「切片」),我決定用原文 Slice。
Go 的 Slice 應用方式接近 C# 的 List,但實質上是個指向陣列的資料結構,透過 Pointer、Length、Capacity 定義陣列的子集合。
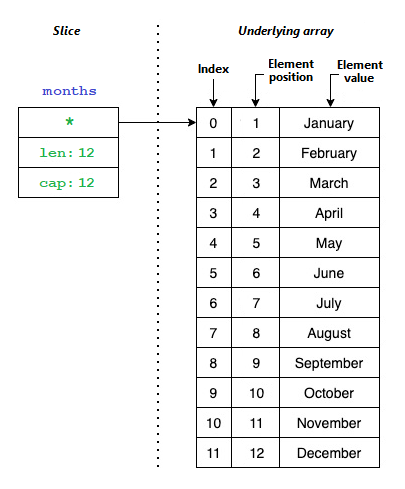
Slice 宣告跟陣列幾乎一樣,只差在不用指定長度,並可用 len()/cap() 取得長度及容量。而透過 months[0:3] 語法可分出新的 Slice。
func main() {
    months := []string{"January", "February", "March", "April", "May", "June", "July", "August", "September", "October", "November", "December"}
    fmt.Println(months)
    fmt.Println("Length:", len(months))
    fmt.Println("Capacity:", cap(months))
    // 用 mothons[起始索引:結束點的下一筆索引]
    quarter1 := months[0:3]
    quarter2 := months[3:6]
    quarter3 := months[6:9]
    quarter4 := months[9:12]
    fmt.Println(quarter1, len(quarter1), cap(quarter1)) // [January February March] 3 12
    fmt.Println(quarter2, len(quarter2), cap(quarter2)) // [April May June] 3 9
    fmt.Println(quarter3, len(quarter3), cap(quarter3)) // [July August September] 3 6
    fmt.Println(quarter4, len(quarter4), cap(quarter4)) // [October November December] 3 3
    // 注意:依起始點不同,cap() 值分別為 12, 9, 6, 3
    // BUT! 你不能存取 Slice 範圍外的元素,即使用 cap() 夠大
    quarter2[3] // 會出錯 runtime error: index out of range [3] with length 3
}
Slice 的長度可以擴充,而切分出的 Slice 會指向相同記憶體位址,append() 可擴充長度,但每次容量會加倍,可能造成記憶體浪費。
要移除元素的話,做法是以要移除的元素索引(例如:d)為界,用 append(sliceVar[:d], sliceVar[d+1:]...) 拼接前段及後段產生新 Slice。
用以下範例驗證:
func main() {
	nums := []int{1, 2, 3, 4, 5, 6}
	s1 := nums[0:3]
	s2 := nums[3:6]
	fmt.Println(s1) // [1 2 3]
	fmt.Println(s2) // [4 5 6]
	//panic: runtime error: index out of range [3] with length 3
	//fmt.Println(s1[3])
	ext4 := s1[:4]    // 擴充長度到 4
	fmt.Println(ext4) // [1 2 3 4]
	ext4[3] = -4
	fmt.Println(s2) // [-4 5 6],證明 ext4[3] 與 s2[0] 是同一個記憶體位置
	s2[0] = 4       // 校正回來
	// Slice 容量可透過 append() 擴充
	fmt.Println(nums, len(nums), cap(nums)) // [1 2 3 4 5 6] 6 6
	nums = append(nums, 7)
	// 注意:原本容量 6,新增第七筆後,長度 7,容量加倍變 12
	fmt.Println(nums, len(nums), cap(nums)) // [1 2 3 4 5 6 7] 7 12
	// 示範移除 4 (index = 3)
	index := 3
	removed := append(nums[:index], nums[index+1:]...)
	fmt.Println(removed, len(removed), cap(removed)) // [1 2 3 5 6 7] 6 12
}
如上面所展示的,Slice 猶如用不同的視窗看同一段記憶體,彼此會互相影響,若 Slice 想擁有自己專屬的資料(指向另一個底層陣列),做法是透過 make() 及 copy() 方法。
func main() {
	letters := []string{"A", "B", "C", "D", "E"}
	slice1 := letters[0:3]
	// 建立長度容量都是 3 的slice
	slice2 := make([]string, 3)
	// 將 letters[0] - letters[2] 複製到 slice2
	copy(slice2, letters[:3])
	slice1[0] = "X"
	slice2[0] = "Y"
	fmt.Println(slice1, len(slice1), cap(slice1)) // [X B C] 3 5
	fmt.Println(slice2, len(slice2), cap(slice2)) // [Y B C] 3 3
}
Map
Go 的 Map 相當於 C# 中的 Dictionary<T, T>,宣告時需指定型別:
func main() {
    studentsAge := map[string]int{
        "john": 32,
        "bob":  31,
    }
    fmt.Println(studentsAge) // map[bob:31 john:32]

    // 要建立空白 Map,可用 make
    newMap := make(map[string]int)
    // 新增或更新
    newMap["john"] = 32
    newMap["bob"] = 31

    // 比較特殊的是不存在的 Key 會傳型別預設值而不會拋出錯誤 (panic)
    fmt.Println(newMap["no-such-key"]) // 會得到 0
	// 正確做法,由第二個參數判斷
	val, exist := newMap["no-such-key"]
	if !exist {
		fmt.Println("No such key")
	} else {
		fmt.Println(val)
	}

	// 刪除 Key/Value 用 delete() (註:Key 不存在不會 panic)
	delete(newMap, "john")

	// 列舉所有 Key 用 range
	for name, age := range studentsAge {
	    fmt.Printf("%s\t%d\n", name, age)
	}
}
結構(Structure)
Go 沒有所謂的類別(Class),但有結構(Structure),使用結構實現邏輯封裝及物件導向。
type Employee struct {
    ID        int
    FirstName string
    LastName  string
    Address   string
}
// 依序傳入屬性值
emp1 := Employee{1001, "John", "Doe", "Doe's Street"}
// 具名指定屬性值
emp2 := Employee{LastName: "Doe", FirstName: "John"}
// 用 & 建立指向相同 Instance 的指標
emp3 := &emp2
emp3.Address = "Spacce" // 修改對象是 emp2
一個結構可內嵌其他結構(Structure Embedding),實現邏輯共用:
type Person struct {
    ID        int
    FirstName string
    LastName  string
    Address   string
}

type Employee struct {
    Information Person
    ManagerID   int
}

var employee Employee
employee.Information.FirstName = "John"
以上範例要做出類似繼承效果,可省略 Employee 中 Person 型別的屬性名稱,讓 Employee 直接擁有 Person 的屬性。
package main

import "fmt"

type Person struct {
    ID        int
    FirstName string `json:"name"`
    LastName  string
    Address   string `json:"address,omitempty"`
}
}

type Employee struct {
    Person
    ManagerID int
}

type Contractor struct {
    Person
    CompanyID int
}

func main() {
    employee := Employee{
        Person: Person{
            FirstName: "John",
        },
    }
    employee.LastName = "Doe"
    fmt.Println(employee.FirstName)
}
身為近代程式語言,支援 JSON 是必要的,Go Struture 使用 `json:"name"` 這種標註方式指定 JSON 轉換規則:
package main

import (
	"encoding/json"
	"fmt"
)

type Person struct {
	ID        int
	FirstName string `json:"name"`
	LastName  string `json:"-"`                 // 忽略不輸出
	Address   string `json:"address,omitempty"` // 無值不顯示
}

type Employee struct {
	Person
	ManagerID int
}

func main() {
	employees := []Employee{
		{
			Person: Person{
				LastName: "Doe", FirstName: "John", Address: "Doe's address",
			},
		},
		{
			Person: Person{
				LastName: "Campbell", FirstName: "David",
			},
		},
	}

	data, _ := json.Marshal(employees) // JSON Serialization
	fmt.Printf("%s\n", data)
	var decoded []Employee
	json.Unmarshal(data, &decoded) // JSON Deserialization
	fmt.Printf("%v", decoded)
}
錯誤處理
Go 處理錯誤的策略跟 C#/JavaScript 有很大不同,執行函式時,成敗狀態或錯誤常被當成回傳值,要求呼叫端檢查,例如:val, exist := someMap["no-such-key"]、newfile, error := os.Create("learnGo.txt"),程式變得囉嗦很多,但錯誤處理變得很明確,且會強迫開發者養成隨時隨地思考「如果出錯怎麼辦」的好習慣,也算 Go 的設計哲學。
package main

import (
    "fmt"
    "os"
)

type Employee struct {
    ID        int
    FirstName string
    LastName  string
    Address   string
}

func main() {
    employee, err := getInformation(1001)
    if err != nil {
        // Something is wrong. Do something.
    } else {
        fmt.Print(employee)
    }
}

// 取得員工資料時,除了資料本身,另外多傳回 Error
func getInformation(id int) (*Employee, error) {
    employee, err := apiCallEmployee(1000)
    // 若上游發生錯誤,employee 傳回 nil,重點在回拋 err
    // 並最好加上適當說明
    if err != nil {
        // fmt.Errorf 會先製作錯誤訊息,再轉成 Error 物件
        return nil, fmt.Errorf("Got an error when getting the employee information: %v", err)
    }
    return employee, err
}

func apiCallEmployee(id int) (*Employee, error) {
    employee := Employee{LastName: "Doe", FirstName: "John"}
    return &employee, nil
}
使用 fmt.Errorf() 每次會產生新的的錯誤物件,我們也可以用 errors.New() 建立 Error 物件重複使用,呼叫端則可用 errors.Is() 檢查。
var ErrNotFound = errors.New("Employee not found!")

func getInformation(id int) (*Employee, error) {
    if id != 1001 {
        return nil, ErrNotFound
    }

    employee := Employee{LastName: "Doe", FirstName: "John"}
    return &employee, nil
}

func main() {
    employee, err := getInformation(1000)
    if errors.Is(err, ErrNotFound) {
        fmt.Printf("NOT FOUND: %v\n", err)
    } else {
        fmt.Print(employee)
    }
}
Logging
Go 內建 log 套件可輸出記錄方便除錯。
func main() {
    // 基本用法,效果如 fmt.Println(),但會加上時間如:2020/12/19 13:39:17 Hey, I'm a log!
    log.Print("Hey, I'm a log!")
    // 顯示訊息並結束程式(類似 os.Exit(1),會看到 exit status 1)
    log.Fatal("Hey, I'm an error log!")
    //  顯示訊息並觸發 panic 結束程式,顯示 Stack Trace
    log.Panic("Hey, I'm an error log!")
    // 設定前置字串
    log.SetPrefix("main(): ")
    log.Print("Hey, I'm a log!") // 顯示 main(): 2021/01/05 13:59:58 Hey, I'm a log!
}
要輸出成 Log 檔,可用開啟檔案再 log.SetOutput(file):
package main

import (
    "log"
    "os"
)

func main() {
    file, err := os.OpenFile("info.log", os.O_CREATE|os.O_APPEND|os.O_WRONLY, 0644)
    if err != nil {
        log.Fatal(err)
    }

    defer file.Close()

    log.SetOutput(file)
    log.Print("Hey, I'm a log!")
}
內建的 Log 機制太陽春,實務上會改用 Logrus、zerolog、zap、Apex 等套件,教學以 zerolog 進行示範。
先 go get -u github.com/rs/zerolog/log 使用 zerolog 可輸出 JSON 格式。
package main

import (
    "github.com/rs/zerolog"
    "github.com/rs/zerolog/log"
)

func main() {
    zerolog.TimeFieldFormat = zerolog.TimeFormatUnix
    // {"level":"debug","time":1609855453,"message":"Hey! I'm a log message!"}
    log.Print("Hey! I'm a log message!")

    // {"level":"debug","EmployeeID":1001,"time":1609855731,"message":"Getting employee information"}
    log.Debug().
        Int("EmployeeID", 1001).
        Msg("Getting employee information")

    // {"level":"debug","Name":"John","time":1609855731}
    log.Debug().
        Str("Name", "John").
        Send()
}
物件導向設計
Go 也可以實現物件導向,但做法跟 C# 有點不同。首先,Go 沒有類別(Class),只有結構(Structure),二則是,Go 的物件方法沒有放在結構內,而是寫成特殊函式 func (variable type) MethodName(parameters ...)。
type triangle struct {
    size int
}

// 計算周長
func (t triangle) perimeter() int {
    return t.size * 3
}

// 若要更新屬性,型別變數需加上 * 傳遞指標
func (t *triangle) doubleSize() {
    t.size *= 2
}
以上的觀察可以用於擴充基本型別,例如 string,但前題是先用 type custString string 定義自訂型別再加工。
package main

import (
    "fmt"
    "strings"
)

type upperstring string

func (s upperstring) Upper() string {
    return strings.ToUpper(string(s))
}

func main() {
    s := upperstring("Learning Go!")
    fmt.Println(s)
    fmt.Println(s.Upper())
}
先前提過的結構內嵌也可用於方法:
type coloredTriangle struct {
    triangle
    color string
}

func main() {
    t := coloredTriangle{triangle{3}, "blue"}
    fmt.Println("Size:", t.size)
    fmt.Println("Perimeter", t.perimeter())
}
看起來很像繼承,其實不然。之所以可以 t.perimeter() 是因為 Go 編譯器偷偷包了一個函式:
func (t coloredTriangle) perimeter() int {
    return t.triangle.perimeter()
}
coloredTriangle 也可以實作自己版本的 perimeter() 覆寫 triangle.perimeter() (例如:周長加倍),此時呼叫 .perimeter() 會得到加倍版,但仍可用 .triangle.perimeter() 取得正常版周長。
func (t coloredTriangle) perimeter() int {
    return return t.size * 3 * 2 // 假設彩色版周長加倍
}

func main() {
    t := coloredTriangle{triangle{3}, "blue"}
    fmt.Println("Size:", t.size)
    fmt.Println("Perimeter (colored)", t.perimeter()) // 18
    fmt.Println("Perimeter (normal)", t.triangle.perimeter()) // 9
}
模組封裝
上面的範例的結構定義在 main.go 中,我們可在 main() 內自由存取結構的所有方法及屬性。若結構是放在獨立模組時中,則需依循大寫起首公開,小寫私用的慣例,例如:
package geometry

type Triangle struct {
    size int
}

func (t *Triangle) doubleSize() {
    t.size *= 2
}

func (t *Triangle) SetSize(size int) {
    t.size = size
}

func (t *Triangle) Perimeter() int {
    t.doubleSize()
    return t.size * 3
}
呼叫時,只有 SetSize()、Perimeter() 可存取,size、doubleSize() 不行。
package main

import (
	"fmt"

	"github.com/myuser/geometry"
)

func main() {
	t := geometry.Triangle{}
	t.SetSize(3)
	// 以下會出錯: t.size undefined (cannot refer to unexported field size)
	// fmt.Println("Size", t.size)
	fmt.Println("Perimeter", t.Perimeter())
}
介面
Go 也支援介面,但不像 C# 等語言要在類別宣告實作介面,約束類別必須實作哪些方法;Go 的結構不需要知道介面的存在,而是在呼叫時將結構轉換為特定介面,之後便可呼叫該介面特有的方法。而編譯器會檢查該結構是否有實作該方法所定義的方法,若有短缺會拋出錯誤。
package main

import (
	"fmt"
	"math"
)
// 定義 Shape 介面
type Shape interface {
	Perimeter() float64
	Area() float64
}
// 正方形
type Square struct {
	size float64
}

func (s Square) Area() float64 {
	return s.size * s.size
}

func (s Square) Perimeter() float64 {
	return s.size * 4
}
// 圓形
type Circle struct {
	radius float64
}

func (c Circle) Area() float64 {
	return math.Pi * c.radius * c.radius
}

func (c Circle) Perimeter() float64 {
	return 2 * math.Pi * c.radius
}
// 列印方法接受 Shape 介面
func printInformation(s Shape) {
	fmt.Printf("%T\n", s)
	fmt.Println("Area: ", s.Area())
	fmt.Println("Perimeter:", s.Perimeter())
	fmt.Println()
}

func main() {
	// 將 Square 指定給 Shape 型別
	var s Shape = Square{3}
	printInformation(s)
    // 將 Circle 指定給 Shape 型別
	c := Circle{6}
	printInformation(c)
}
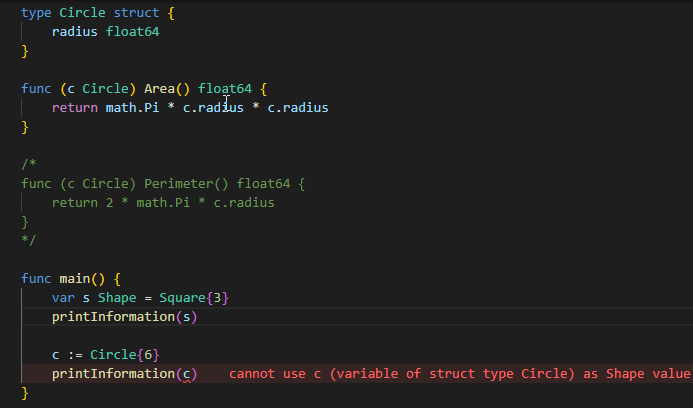
若要驗證編譯器會檢查結構與介面是否吻合,我們將 Circle 的 Perimeter() 方法註解掉,編譯時會出現以下錯誤:cannot use c (variable of struct type Circle) as Shape value in argument to printInformation: Circle does not implement Shape (missing method Perimeter)
在 C# 中我們可以在類別 override string ToString() 覆寫基底類別的 ToString() 方法,改變將類別當成字串輸出時的內容。而在 Go 裡也有類似的技巧,結構可實作 String() 方法,fmt.Printf("%s") 會將結構視為字串輸出。
type Stringer interface {
    String() string
}
範例:
package main

import "fmt"

type Person struct {
    Name, Country string
}

func (p Person) String() string {
    return fmt.Sprintf("%v is from %v", p.Name, p.Country)
}
func main() {
    rs := Person{"John Doe", "USA"}
    ab := Person{"Mark Collins", "United Kingdom"}
    fmt.Printf("%s\n%s\n", rs, ab)
}
教學裡舉了另一個呼叫 http.Get() 取回 JSON 字串,自訂 customWriter 結構實作 Write(p []byte) (n int, err error) 吻合內建 Writer 介面,之後借用 io.Copy(writer, resp.Body) 將 HTTP 回應交由 customWriter 輸出清單名稱的小技巧,很有 Go 的風格。(程式範例可參考教學文件的【擴充現有的實作】小節)
教學有另一個案例,也可體驗所謂 Go 風格的網站寫法:(細節可參考教學文件的【撰寫自訂伺服器 API作】小節)
package main

import (
    "fmt"
    "log"
    "net/http"
)

// 宣告自訂 dollars 型別
type dollars float32
// 實作 String() 支援 Fprintf(w, "%s") 輸出成字串
func (d dollars) String() string {
    return fmt.Sprintf("$%.2f", d)
}
// 宣告自訂 database 型別(底層是 <string, dollars> 雜湊表)
type database map[string]dollars
// database 實作 Handler 要求的 ServeHTTP(w ResponseWriter, r *Request) 方法
// 可接收 HTTP Request 回應結果,直接變成 Web 服務
func (db database) ServeHTTP(w http.ResponseWriter, req *http.Request) {
    for item, price := range db {
        fmt.Fprintf(w, "%s: %s\n", item, price)
    }
}

func main() {
    db := database{"Go T-Shirt": 25, "Go Jacket": 55}
    log.Fatal(http.ListenAndServe("localhost:8000", db))
}
平行處理/並行
Go 從語言層次支援平行處理,獨創的 Goroutine 概念與其他程式語言大不相同。對於平行處理最頭痛資源共用及競爭(Racing)問題,Go 的策略是只允許一個 Goroutine 可以存取資料,徹底社絕競爭狀況,核心精神是:「不透過共用記憶體進行通訊; 而是藉由通訊來共用記憶體。」
用簡單範例展示 Go 如何循序執行轉為平行處理:
func main() {
    start := time.Now()

    apis := []string{
        "https://management.azure.com",
        "https://dev.azure.com",
        "https://api.github.com",
        "https://outlook.office.com/",
        "https://api.somewhereintheinternet.com/",
        "https://graph.microsoft.com",
    }

    for _, api := range apis {
        _, err := http.Get(api)
        if err != nil {
            fmt.Printf("ERROR: %s is down!\n", api)
            continue
        }

        fmt.Printf("SUCCESS: %s is up and running!\n", api)
    }

    elapsed := time.Since(start)
    fmt.Printf("Done! It took %v seconds!\n", elapsed.Seconds())
}
做法是先將 for 迴圈中的邏輯抽離成函式 checkAPI(),for 迴圈改為呼叫 checkAPI(),並加上 go 關鍵字。這裡需要多了解通道 Channel 的概念,可以想像它是一個 Queue,可供 checkAPI 寫入資料,最後再逐一讀取出來。
// 參數除了 API 網址外,還需傳入通道(Channel)
func checkAPI(api string, ch chan string) {
    _, err := http.Get(api)
    if err != nil {
        // 傳送結果字串給通道
        ch <- fmt.Sprintf("ERROR: %s is down!\n", api)
        return
    }
    // 傳送結果字串給通道
    ch <- fmt.Sprintf("SUCCESS: %s is up and running!\n", api)
}
// ...略...
// 建立傳送字串類型的通道
ch := make(chan string)

for _, api := range apis {
    go checkAPI(api, ch)
}

// 從通道接收結果
for i := 0; i < len(apis); i++ {
    fmt.Print(<-ch)
}
關於 Go 通道的阻塞(Block)及可緩衝通道(Buffered Channel),我另寫了一篇關於 Go Channel 同步化行為詳細說明。
自動測試
教學用一個銀行存款轉帳情境當範例,展示如何撰寫自動測試實踐 TDD。
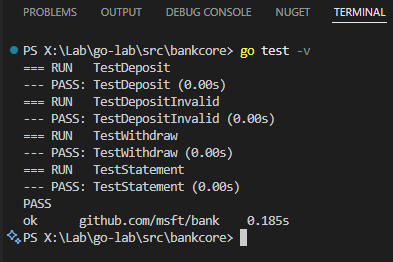
測試檔案時,檔案名稱的結尾必須是 _test.go,使用 go test -v 執行測試。
Comments
# by 黑心
問一下,Go 語言目前的應用?前端工程師是否值得投入?
# by Tim
微軟教學的連結好像不見了? 不確定是不是下架了
# by Jeffrey
to Tim, 的確是下架了。詢問結果是 MS Learn 的政策做了調整,未來會以微軟直接支持的程式語言為主,以確保品質並符合主要客群的需求。(畢竟像我這樣跑到 MS Learn 學 Vue/Python/Go 的人不多,噗) 在 MS Learn 看到其他語言教學已成為絕響。