小試 ASP.NET Core Identity
| | | 10 | |
ASP.NET Identity 是 One ASP.NET 時代推出的新一代網站會員身分管理機制,而它也是 Visual Studio ASP.NET Core 專案範本內建的身分認證選項。
在 ASP.NET Core 網站想實作會員管理機制,得準備會員註冊、帳號登入、修改密碼及忘記密碼等功能,ASP.NET Identity 是最簡便可靠的現成解決方案,能節省可觀的開發工夫。(更別提土砲版與 ASP.NET Team 出品的品質差異)
這篇文章整理在 ASP.NET Core 引用 ASP.NET Identity 建立本機會員資料庫的要點:
首先在 Visual Studio 新增 ASP.NET Core 網站時,除了選擇 Empty、MVC、WebAPI、Razor Pages,右方有個 Authentication,請選擇 Individual User Accounts,資料來源選 Store user accounts in-app:
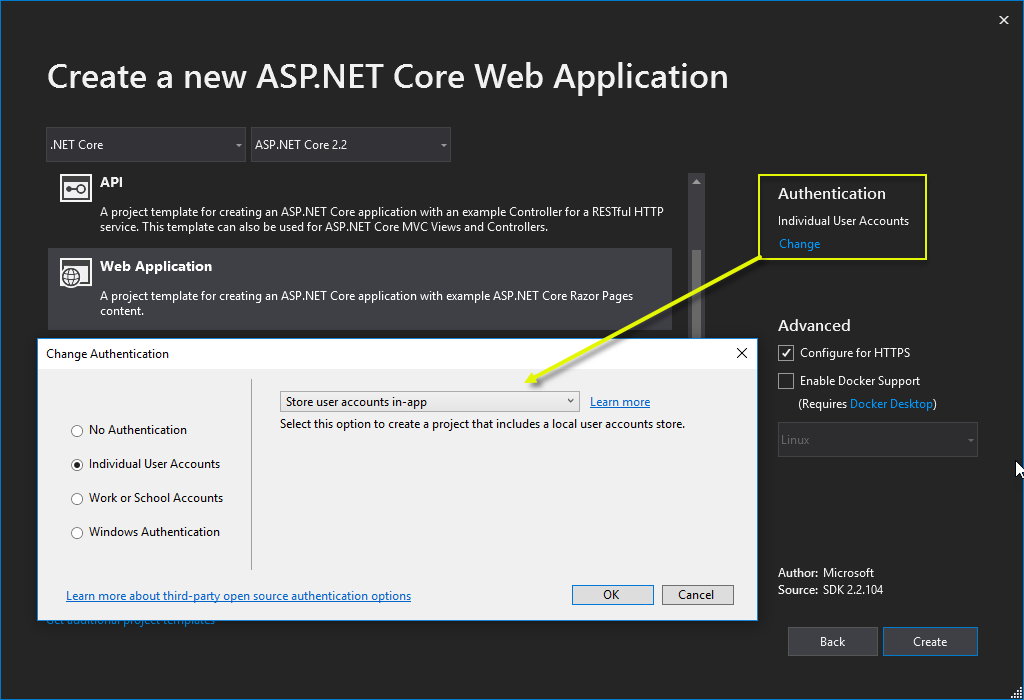
啟用 Individual User Accounts / Store user accounts in-app 時,專案會多幾樣東西:
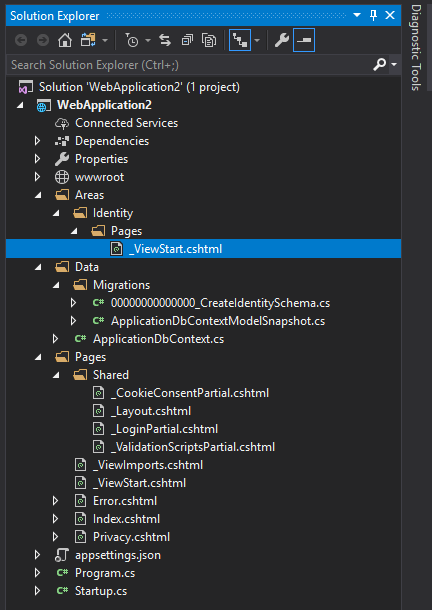
Areas/Identity/Pages 為會員管理相關介面,但只剩 _ViewStart.cshtml 可以微調版面,註冊新會員、帳號登入、修改密碼、忘記密碼等介面數十個 Razor Page cshtml 在 ASP.NET Core 2.1 後被收納到 Microsoft.AspNetCore.Identity.UI NuGet 程式庫。(如有特殊客製需求有方法可修改,但需留意調整不當將導致功能異常或影響資安。 由 ASP.NET Core Identity 選擇用 Razor Pages 寫 UI 來看,Razor Pages 早晚會成為走跳 ASP.NET Core 江湖的必備技能。)
Data/ApplicationDbContext.cs 為 ASP.NET Identity 搭配的 Entity Framework 資料物件 Data/Migrations 下兩個檔案用於定義 ASP.NET Identity 所需 SQL 資料庫的 Schema 資訊。ASP.NET Identity 預設使用 SQL Server Express LocalDB 儲存會員帳號資料,如果你沒有手動建立,嘗試註冊或登入時會看到以下訊息:
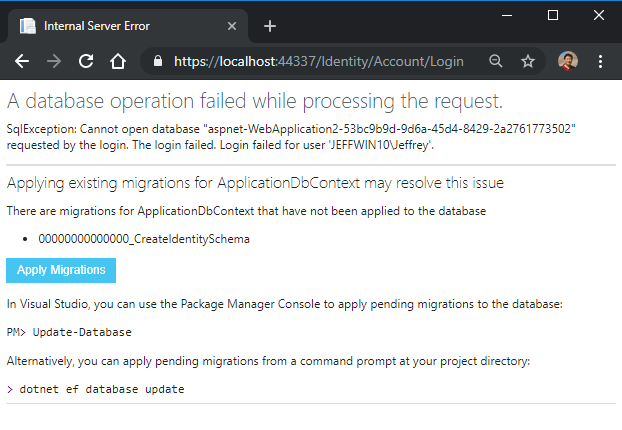
解決方法也如訊息所說,在 Package Manager Console 下指令 Update-Database 或用命令列工具執行dotnet ef database update
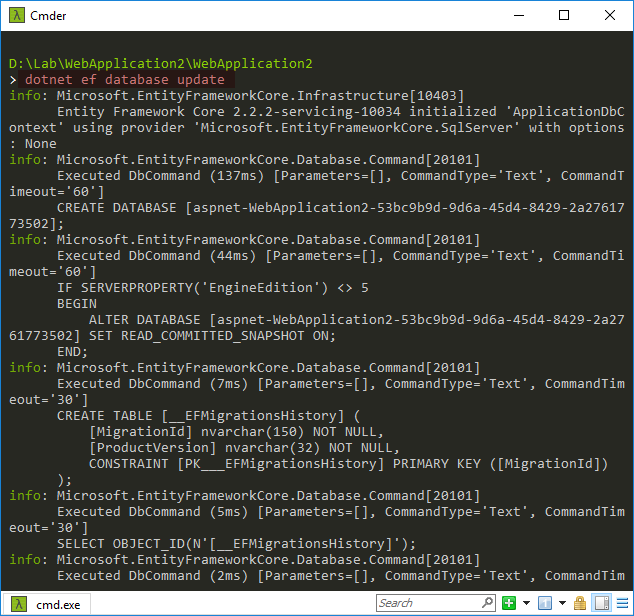
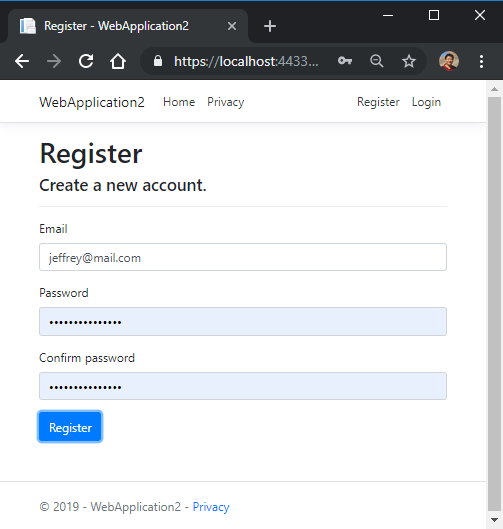
[2019-08-29 補充]感謝讀者 Ike 補充,更快的方法是直接按網頁上的「Apply Migrations」就會建立資料表,連指令都不用跑。建好資料庫,點選網站上的 Register 可以註冊新帳號並登入:
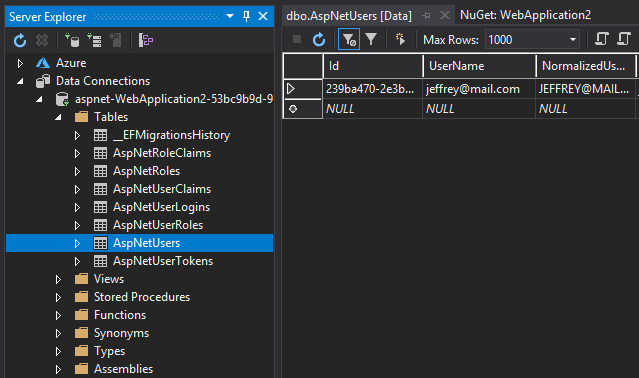
用 Visual Studio 的 Server Explorer 開啟 SQL LocalDB 資料庫可查到剛才註冊的新帳號:
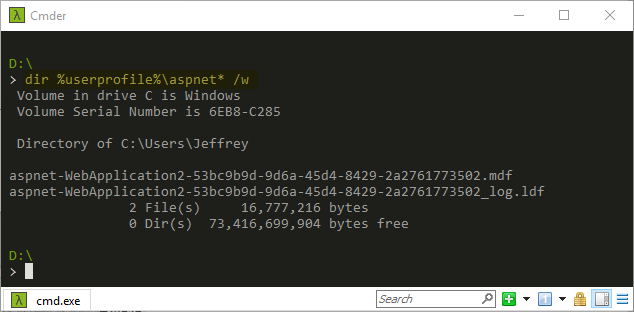
初學者在此有時會卡關,LocalDB 的資料庫檔案不在專案目錄下,到底被放到哪裡去了? 答案是 C:\Users\使用者帳號 下,用dir %userprofile%\asp-*可以找到它:
實際部署到 IIS 時通常不會搭配 LocalDB (LocalDB 適合使用者本機環境,要移到 IIS 使用需費一番手腳),常見做法是改用 SQL Server (SQL Server Express 亦可),這點只需修改 appsetings.json 即可如願:(一樣可透過 dotnet ef database update 建立資料表,但記得要開 DB 權限)
"ConnectionStrings": {
 "DefaultConnection": "Server=yourSQL;User Id=username;Password=password;Initial Catalog=databaseName;Trusted_Connection=True;MultipleActiveResultSets=true"
}
若還是很想在 IIS 上用 LocalDB(不建議),可參考以下文章:
要限定 Razor Page 需要登入才能使用,做法跟 MVC Controller 一樣,加上 [Authorize] 即可:
 [Authorize]
 public class VIPModel : PageModel
 {
     public void OnGet()
     {

     }
 }
ASP.NET Identity 的設定程式碼放在 Startup.cs,如果要修改密碼錯誤鎖定帳號次數等可透過
services.Configure<IdentityOptions>()指定:參考services.AddDbContext<ApplicationDbContext>(options => options.UseSqlServer( Configuration.GetConnectionString("DefaultConnection"))); services.AddDefaultIdentity<IdentityUser>() .AddDefaultUI(UIFramework.Bootstrap4) .AddEntityFrameworkStores<ApplicationDbContext>();
以上是在 ASP.NET Core 使用 ASP.NET Identity 登入機制的簡要說明,祝大家玩得愉快~
Tips of enabling ASP.NET Identity with SQL data store in ASP.NET Core web project.
Comments
# by Ike
在 要點3,如果沒有手動建立會員帳號資料,印象中也可以按「Apply Migrations」按鈕一鍵建立資料
# by Stanley
最近也在玩這個,想把email改成單純的user name,但找了很久都沒找到修改方法
# by Jeffrey
to Ike, 哦哦哦,居然沒發現,已補充於本文,感謝。
# by Jeffrey
to Stanley, 有評估過,登入帳號不用Email修改工程很大,想到的取巧做法是調註冊跟登入UI,輸入UserName,後送時偷加 @mail.whatever,但覺得算是費事而作罷。
# by ITWeiHan
幫Ike大大補充圖片,這算是偷懶的好技巧 ^___^ 
# by ITWeiHan
疑 黑大 留言不能使用markdown? 我記得MiniBlog.Core支援的
# by Jeffrey
to ITWeiHan, 感謝。MiniBlog.Core 留言應該不支援 Markdown (易有安全疑慮),這裡可以實測 => https://miniblogcore.azurewebsites.net/blog/
# by phil
如果用token based,好像還是會產生cookie
# by Felix
用MVC Template 預設的 DefaultIdentity 的話, 如果要自定義註冊和登入所使用的欄位, 恐怕要在Github 上改源碼 https://github.com/dotnet/aspnetcore/tree/main/src/Identity/UI/src/Areas/Identity/Pages/V4/Account 重新打包. 容易一點的就自己寫註冊和登入邏輯和UI, 對 Identity 進行擴展, 例如 增加資料庫欄位, 先參考 http://blogs.uuu.com.tw/Articles/post/2018/01/10/ASPNET-Identity-Core%E5%85%A5%E9%96%80-1.aspx 進行擴展 再參考 https://github.com/dotnet/aspnetcore/blob/v3.1.12/src/Identity/samples/IdentitySample.Mvc/Controllers/AccountController.cs 建立用戶這樣就可以不用Email 了, 自己定義了一個 NickName 欄位作為用戶帳戶. var user = new ApplicationUser { UserName = model.NickName }; var result = await _userManager.CreateAsync(user, model.Password); 登入就 var result = await _signInManager.PasswordSignInAsync(model.NickName, model.Password, model.RememberMe, lockoutOnFailure: false);
# by richie
請問一下此方法可以用在DB first 嗎?