在 Windows 為 Rust、Python、C/C++ 準備 MSVC 編譯環境
 |  | 0 |  |
AI 出現之前,寫程式比較單純的,你學習並熟悉某種程式語言,或許是 JavaScript、Java 或 C#,不管遇到任何需求,都想辦法用它開發就對了,因為這是你最有把握,成功率最高的一條路。
現在可不一樣,跟 AI 說完需求 (小提醒:記得講需求不要直接下指令,才不會錯過驚喜),AI 可能會建議用 Rust 寫效能比較好、直接用 C 實作整合度最高,或是 Python 剛好有現成程式庫可以套,如果有需要可以馬上起跑,這時你還要堅持「不! 不是 C# 我不要」?
一年前的我還會堅持,隨著 AI 不斷進化以及全面接手人類的開發工作,我現在已經投降認清現實:在一些特定語言具備絕對優勢的情境,開發者該調整成主管心態,允許 AI 用你沒學過的程式語言或技術更有效率完成任務。前題是你不懂細節但知道運作方式,出問題時有能力現學現賣進場協助排除問題。人人都在用 AI,心態不調整,肯定要輸給不被語言束縛的人。
這篇說說配合 AI 切換語言時 Windows 常遇到的一個需求 - 安裝 C/C++ 編譯環境。
Windows 不像 Linux 自帶編譯器用 apt install 就能安裝。Rust 預設使用 MSVC ABI,需要 Visual Studio 提供的 linker 與函式庫才能產生 exe;若遇到 Python 套件沒提供 wheel,pip 從原始碼安裝時需要 C/C++ 編譯器;CPython 官方版本以 Visual C++ 編譯,用 MinGW 可能有相容問題。
綜合評比,Microsoft C++ (MSVC) Build Tools 是 Windows 準備 C 編譯工具的首選。
| 方案 | 適用情境 | 備註 |
|---|---|---|
| MSVC Build Tools | Rust (預設)、Python 擴充套件、一般 Windows 原生開發 | 只裝命令列工具,不含 IDE |
| Visual Studio | 需要 IDE、除錯器 | 也包含命令列工具 |
| Clang/LLVM | 需要 Clang 相容性 | 以 clang-cl 模式搭配 MS STL |
| MinGW-w64 (MSYS2) | 需與 GNU 生態互通 | Rust 需改用 GNU target |
註:Build Tools 2022 起放寬:編譯開源 C++ 相依套件時,即使在企業內開發閉源專案,也不需 Visual Studio 授權。 若要用 Visual Studio 開發專有 C++ 程式碼,仍需授權。Updates to Visual Studio Build Tools license for C and C++ Open-Source projects - Microsoft C++ Team Blog。rustup-init 會自動安裝 Visual Studio Community,個人、學術、開源免費,企業商業用途需確認授權。
之前我都是用安裝程式安裝 MS Build Tools,時代改變了,我現在能用 CLI 就不滑鼠,需 Build Tools 可以用 winget 安裝。
研究了一下,最新版是 VS 2026,但目前一些第三方程式的 CMake 設定、相依函式庫的下載腳本與範例指令 (例如 -G "Visual Studio 17 2022") 仍以 2022 為主,決定還是先裝 2022 版本。
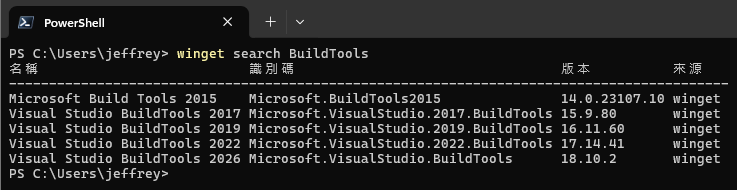
以系統管理員身分執行:
winget install -e --id Microsoft.VisualStudio.2022.BuildTools --override "--add Microsoft.VisualStudio.Workload.VCTools --includeRecommended --passive --wait"
Microsoft.VisualStudio.Workload.VCTools為「Desktop development with C++」,包含 MSVC 核心、Windows Universal C Runtime 等;推薦元件含 MSVC x64/x86 編譯器、CMake 工具、Windows SDK、AddressSanitizer參考--override會取代 winget 預設傳給安裝程式的參數,指定--passive顯示進度但不互動;--wait等安裝完成才回傳--add預設只裝必要元件,加--includeRecommended會包含推薦元件,不加的話得增加指定 CMake 跟 Windows SDK 等元件,建議加上較省事
有個麻煩的小地方是,MSVC 不能直接在一般命令提示字元使用,需要設定 PATH、INCLUDE、LIB 等變數。傳統做法是用開始功能表的 Developer Command Prompt 與 Developer PowerShell 捷徑(搜尋 developer command prompt 或 developer powershell);再不然是找到 VS 或 Build Tools 安裝路徑跑 <vs-install-dir>\VC\Auxiliary\Build\vcvars64.bat (x64 原生) 或 vcvarsall.bat x64 或 Common7\Tools\Launch-VsDevShell.ps1
以下這段 PowerShell 可以自動找到有安裝 MSVC x64 工具的 Visual Studio 或 Build Tools,呼叫 Enter-VsDevShell Cmdlet 載入相關環境變數,以便直接呼叫 MSVC 編譯程式及 CMake:
# 找到含 MSVC x64 工具的最新 Visual Studio / Build Tools,並載入 x64 開發者環境
$vswhere = Join-Path ${env:ProgramFiles(x86)} 'Microsoft Visual Studio\Installer\vswhere.exe'
if (-not (Test-Path $vswhere)) { throw "找不到 vswhere.exe:$vswhere" }

# -products * 是必要的,否則查不到 Build Tools
# 若需要指定版本,加上 -version,例如 VS 2022:-version '[17.0,18.0)'
$vs = & $vswhere -latest -products * `
  -requires Microsoft.VisualStudio.Component.VC.Tools.x86.x64 `
  -property installationPath
if (-not $vs) { throw '找不到含 MSVC x64 工具的 Visual Studio / Build Tools' }

Import-Module (Join-Path $vs 'Common7\Tools\Microsoft.VisualStudio.DevShell.dll')
Enter-VsDevShell -VsInstallPath $vs -SkipAutomaticLocation `
  -DevCmdArguments '-arch=x64 -host_arch=x64' | Out-Null
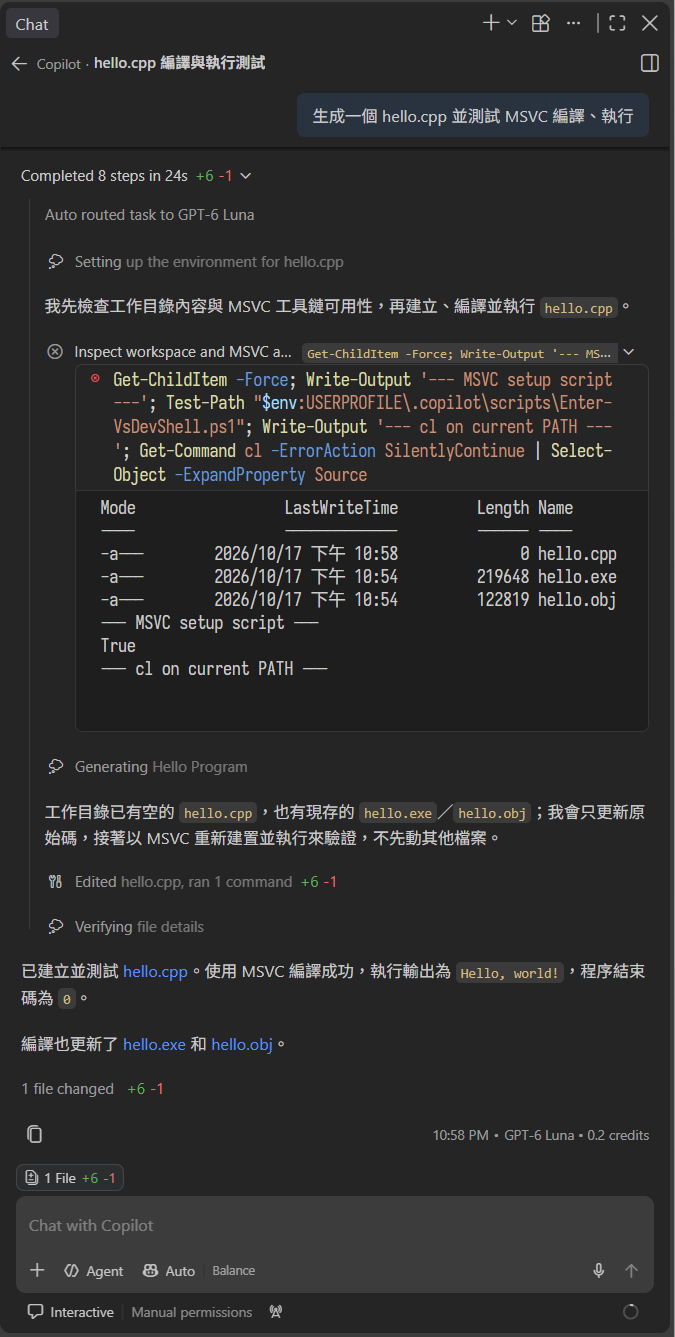
而為了讓 Github Copilot Agent 在執行 Rust、Python 相關作業需要 MSVC 時能啟用,我將以上 PowerShell 存成 $env:USERPROFILE\.copilot\scripts\Enter-VsDevShell.ps1,並加入 $env:USERPROFILE\.copilot\instructions\msvc.instructions.md:
---
applyTo: "**"
---
On Windows, before running cl / link / cmake / ninja / nmake / msbuild,
load the VS developer environment in the same PowerShell session, on the same line as the build:
    & "$env:USERPROFILE\.copilot\scripts\Enter-VsDevShell.ps1"; cmake --build build
實測提示夠簡單明確,連 GPT-6.1-Luna 也能跟著照做,成功~
Comments
Be the first to post a comment