筆記-使用 PowerShell 設定 IIS 網站
 |  | 0 |  |  |
前篇文章由 WMI 資料解析出現有網站設定,經過篩選及調整,下一步計劃轉換成設定 IIS 網站的自動化腳本,以省去在 WebFarm 伺服器一台一台點選操作的煩人手工,也避免人為操作發生疏漏。
PowerShell 已是管理 Windows 的奧林匹克官方指定語言, 可支援 IIS 的大小管理操作,擺著不用是跟自己過不去,雖然對 PowerShell 一知半解,還是得硬著頭皮學會,以下整理我還原 IIS 網站設定用到的指令:(各方達人如知更便捷的做法,請不吝指教)
1. 建立 Application Pool
開始前請記得 Import-Module WebAdministration 載入 IIS 管理模組。New-Item 指定 Path 就可建立 Application Pool,建立後用 Get-ItemProperty 可以看到該集區的設定。
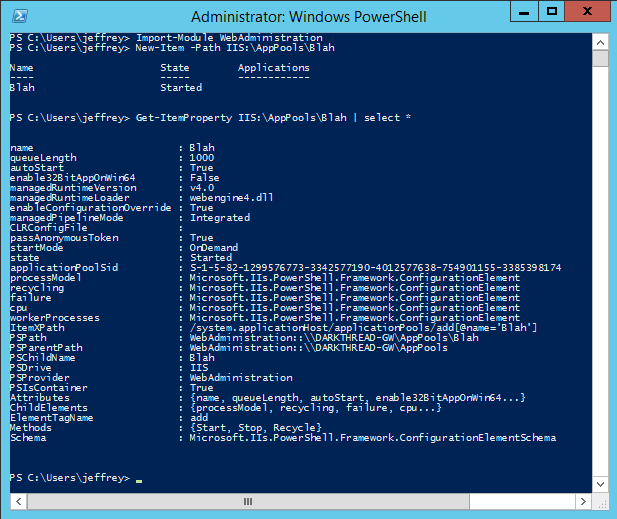
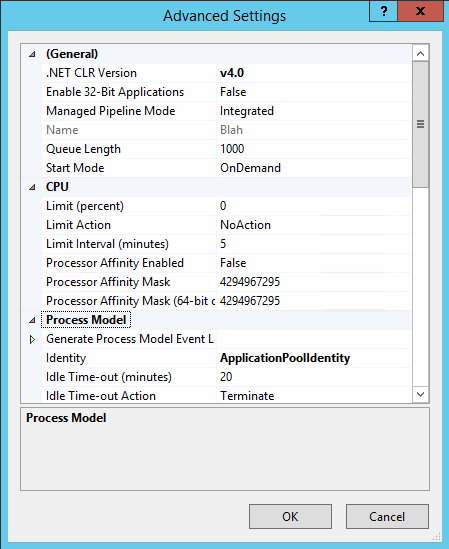
Get-ItemProperty 取回的屬性資料可一一對應到 IIS 管理介面的集區進階設定,例如:queueLength 是 Queue Length、enable32BitAppOnWin64 是 Enable 32-Bit Applications:
如果要修改設定,可使用 Set-ItemProperty Cmdlet,例如以下指令啟用 Enable 32-Bit Applications:
Set-ItemProperty -Path IIS:\AppPools\Blah -Name enable32BitAppOnWin64 -Value true
有些設定在第二層,例如:processModel.identityType,寫成 Set-ItemProperty -Path IIS:\AppPools\Blah -Name "processModel.identityType" -value 2 (2 = Network Service)
AppPool 各設定屬性及說明可參考 MSDN 文件:applicationPool processModel
註:如要查詢現有 processModel 設定,可用 Get-ItemProperty -Path IIS:\AppPools\Blah -Name prcessModel
2. 設定網站應用程式及虛擬目錄
建立網站應用程式
New-Item 'IIS:\Sites\Default Web Site\Blah' -physicalPath C:\WWW\Blah -type Application -applicaionPool Blah
建立虛擬目錄
New-Item 'IIS:\Sites\Default Web Site\BlahDir' -physicalPath C:\WWW\BlahDir -type VirtualDirectory
3. 設定 UNC 外部虛擬目錄並指定帳號密碼
New-Item 'IIS:\Sites\Default Web Site\UNCTest' -physicalPath \\RemoteServer\ShareName -type VirtualDirectory
Set-ItemProperty -Path ''IIS:\Sites\Default Web Site\UNCTest' -Name userName -Value logonName
Set-ItemProperty -Path ''IIS:\Sites\Default Web Site\UNCTest' -Name password -Value XXXX
4. 設定匿名存取或整合式驗證
以下範例關閉匿名存取並啟用 Windows 整合式驗證
Set-WebConfigurationProperty -Filter /system.webServer/security/authentication/anonymousAuthentication -Name enabled -Value false -PSPath IIS:\ -location 'Default Web Site/Blah'
Set-WebConfigurationProperty -filter /system.webServer/security/authentication/windowsAuthentication -Name enabled -Value true -PSPath IIS:\ -Location 'Default Web Site/Blah'
屬性參考:authentication
5. 限定存取 IP
Set-WebConfigurationProperty -Filter /system.webserver/security/ipsecurity -Name allowUnlisted -Value false -PSPath IIS:\ -Location 'Default Web Site/Blah'
Add-WebConfiguration /system.webServer/security/ipSecurity -Value @{ipAddress="192.168.1.1";allowed="true"} -PSPath IIS:\ -Location 'Default Web Site/Blah'
屬性參考:ipSecurity
【參考資料】
- Manage IIS Application Pools With PowerShell
- IIS application pool identity – 運用PowerShell自動化修改IIS AppPool identity 及 password – Griffey
- Web Administration (IIS) Provider for Windows PowerShell
- PowerShell Snap-in- Creating Web-Sites, Web applications, Virtual Directories and Application Po
- PowerShell Snap-in- Changing Simple Settings in Configuration Sections - The Official Microsoft
Comments
Be the first to post a comment