網頁操作及自動測試程式開發利器 - Playwright for .NET 筆記
| | | 4 | |
之前在用 C# 呼叫 Chrome 批次產生網頁快照的簡便做法 讀者 Rong 留言提到 Playwright。最近計劃寫一些機器人程式將複雜網頁操作自動化,機緣成熟,這回就不用 PuppeteerSharp 了,想試試很多人推的 Playwright。
Playwright 是微軟 2019 推出的網頁自動測試框架,同時支援 Chromium、Firefox 及 WebKit (Safari 採用的核心),涵蓋所有主流瀏覽器,並能跨平台執行。
對我來說,Playwright 與 Selenium、PuppeteerSharp 都能實現機器人操作及自動測試,Playwright 最大優勢在於它的微軟血統。撇開保證 100% 原生支援 .NET 這點不談,API 介面「非常微軟」是最讓我心動的點,這有些難以言喻,但寫起來非常有感。
過去每每使用移植自其他語言的程式庫,例如:NPOI、NLog... 即便是 .NET 物件、參數、方法,但凡從命名、參數傳遞方式、呼叫步驟到設定檔寫法,總能嗅出濃濃的「異國風情」,好比明明是中文也聽得懂,但「現在我有冰淇淋」怎麼聽就是不對勁。用 .NET 寫了幾段 Playwright 小程式,確定 Playwright for .NET 是個「Native Speaker」無誤,字正腔圓,流暢清晰,令人心曠神怡,舒服到心坎裡。
Playwright for .NET 官方文件的說明很完整,是絕佳的入門教材。我聚焦在如何用 Playwright 操作及整合瀏覽器,整理術語及重點如下:
啟動瀏覽器
起手式如下:
using Microsoft.Playwright;

using var playwright = await Playwright.CreateAsync();
await using var browser = await playwright.Chromium.LaunchAsync();
var page = await browser.NewPageAsync();
await page.GotoAsync("https://playwright.dev/dotnet");
await page.ScreenshotAsync(new()
{
    Path = "screenshot.png"
});
跟 Puppeteer 一樣,預設會下載 Chromium 瀏覽器來跑測試,LaunchAsync() 可傳入 BrowserTypeLaunchOptions 指定 Channel(chrome, chrome-beta, msedge...)、ExecutablePath(使用主機上安裝的 Chrome/Edge,不要另外下載)、Args(啟動參數)... 等 參考文件
操作網頁元素
操作元素前要先找到指定的按鈕、輸入框、連結等,術語叫 Locator。Page 物件提供了 GetByRole()、GetByText()、GetByLabel()、GetByPlaceholder()、GetByAltText()、GetByTitle()、GetByTestId()、Frame()、FrameByUrl() 等方法找到指定元素。較複雜的邏輯可以用 Page.Locator("#elemId") 以選擇器(Selector)字串選取。
Playwright Selector 大致遵循標準 CSS 選擇器語法,並加入一些自訂類別::visible、:text()、:has-text()、:text-is()、:text-matches()、:has()、:is()、:nth-match()、:right-of()、:left-of()、:above()、:below()、:near() 參考
找到元素後可執行以下動作:參考
- FillAsync() 填入文字
- CheckAsync() 勾選或點選方塊
- SelectOptionAsync() 選取下拉選單
- ClickAsync() 滑鼠點擊 (可傳參數點右鍵,加 Shift、Ctrl)
- DblClickAsync() 滑鼠雙擊
- HoverAsync() 滑鼠滑過
- PressAsync() 模擬鍵盤輸入
- DispatchEventAsync() 觸發 JavaScript 事件
- SetInputFilesAsync() 選擇上傳檔案,傳入檔名或直接由記憶體建立檔案內容
await page.GetByLabel("Upload file").SetInputFilesAsync(new FilePayload { Name = "file.txt", MimeType = "text/plain", Buffer = System.Text.Encoding.UTF8.GetBytes("this is a test"), }); - FocusAsync() 取得焦點
- DragToAsync() 將元素拖到另一個元素上
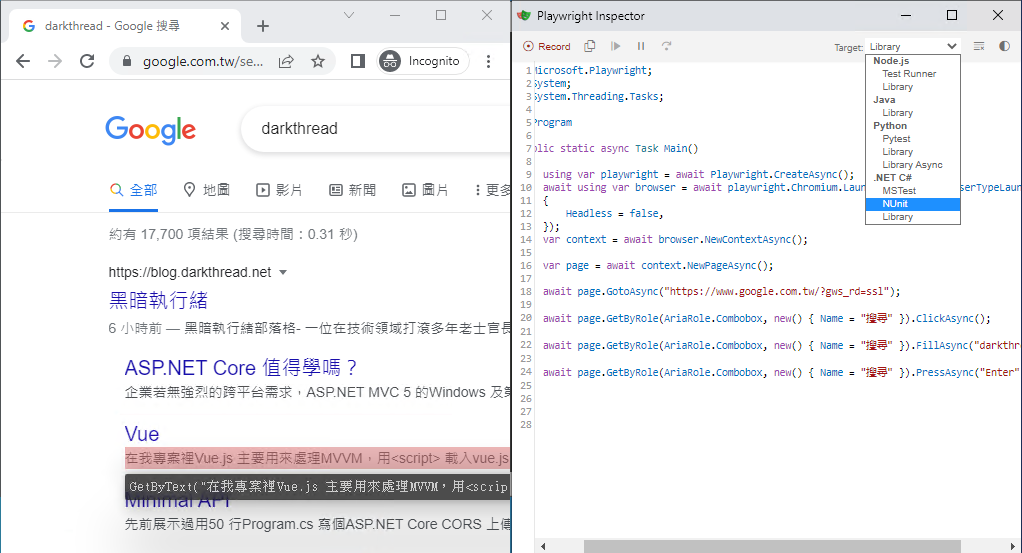
錄製操作過程並產生程式碼
測試或操作程式要怎麼寫,沒有什麼做法比實際操作一遍讓它自動產生更直覺了。Playwright 的錄製工具做得相當出色,方便初學階段快速上手。它能支援針對多種程式語及及測試框架產生程式碼、滑鼠移到元素時會帶出建議的 Locator 寫法、依操作動作對映 FillAsync()、PressAsync() 等方法,實際體驗過你就知道為什麼我會讚不絕口了:
參考
等待瀏覽器
做完操作後等待瀏覽器或 DOM 就緒再進行下一步是自動化作業的重要環節,Playwright 提供了一些做法。參考
等待 HTTP 請求:
var waitForRequestTask = page.WaitForRequestAsync("**/*logo*.png");
await page.GotoAsync("https://wikipedia.org");
var request = await waitForRequestTask;
Console.WriteLine(request.Url);
等 Popup 新視窗,並對其進行操作:
var popup = await page.RunAndWaitForPopupAsync(async =>
{
    await page.GetByText("open the popup").ClickAsync();
});
await popup.GotoAsync("https://wikipedia.org");
攔截 Requset/RequestFinished 事件:
page.Request += (_, request) => Console.WriteLine("Request sent: " + request.Url);
void listener(object sender, IRequest request)
{
    Console.WriteLine("Request finished: " + request.Url);
};
page.RequestFinished += listener;
await page.GotoAsync("https://wikipedia.org");

// Remove previously added listener.
page.RequestFinished -= listener;
await page.GotoAsync("https://www.openstreetmap.org/");
ClickAsync() 等動作若觸發切換頁面,Playwright 會自動等待新網頁載入,但也可加上自訂等待確認狀態就緒:
await page.Locator("button").ClickAsync(); // Click triggers navigation
await page.WaitForLoadStateAsync(LoadState.NetworkIdle); // This resolves after "networkidle"
若網頁需要一段時間建構畫面,可使用 WaitForAsync() 等待元素就緒:
// Click will auto-wait for the element and trigger navigation
await page.GetByText("Login").ClickAsync();
// Wait for the element
await page.GetByLabel("User Name").WaitForAsync();
若按完鈕要等待一些 AJAX 請求或透過 setTimeout 切換到下一頁,可使用以下做法:
await page.RunAndWaitForNavigationAsync(async () =>
{
    // 按此鈕後 setTimeout 導向新頁
    await page.GetByText("Navigate after timeout").ClickAsync();
});
// 若按鈕後多次切換 history state
await page.RunAndWaitForNavigationAsync(async () =>
{
    await page.GetByText("Click me").ClickAsync();
}, new()
{
    // 等待特定 URL
    UrlString = "**/login"
});
等待開啟新視窗:
var popup = await page.RunAndWaitForPopupAsync(async () =>
{
    await page.GetByText("Open popup").ClickAsync();
});
popup.WaitForLoadStateAsync(LoadState.Load);
自訂等待邏輯:
await page.GotoAsync("http://example.com");
await page.WaitForFunctionAsync("() => window.amILoadedYet()");
// Ready to take a screenshot, according to the page itself.
await page.ScreenshotAsync();
下載檔案
LaunchAsync() 時可指定 DowloadsPath 下載檔存放路徑,再用以下方式等待下載:參考
var waitForDownloadTask = page.WaitForDownloadAsync();
await page.GetByText("Download file").ClickAsync();
var download = await waitForDownloadTask;
Console.WriteLine(await download.PathAsync());
await download.SaveAsAsync("/path/to/save/download/at.txt");

// 無差別攔截下載
page.Download += (sender, download) => Console.WriteLine(download.Url);
執行 JavaScript
不囉嗦,直接看範例:參考
var href = await page.EvaluateAsync<string>("document.location.href");
// 傳參數
await page.EvaluateAsync<int>("num => num", 42);
await page.EvaluateAsync<object>("object => object.foo", new { foo = "bar" });
// 匿名物件傳多個參數
var button1 = await page.EvaluateAsync("window.button1");
var button2 = await page.EvaluateAsync("window.button2");
await page.EvaluateAsync("o => o.button1.textContent + o.button2.textContent", new { button1, button2 });
// 物件解構
await page.EvaluateAsync("({ button1, button2 }) => button1.textContent + button2.textContent", new { button1, button2 });
處理 alert/confirm
alert()/confirm() 彈出對話框時會阻擋其他操作及 JavaScript 執行,處理起來頗麻煩,Playwright 的解法是預先掛上事件決定動作,beforeunload 也是採相似方式處理。參考
page.Dialog += (_, dialog) => dialog.AcceptAsync();
await page.GetByRole(AriaRole.Button).ClickAsync();
其他進階技巧
Playwright 的官方文件很完整,也是好用的原因之一,限於篇幅我只集中在我常用的項目,其他的部分大家可以自己去挖寶。
以上就是 Playwright for .NET 的基本知識,有機會再來分享我的應用實例。
Introduction to Playwright for .NET.
Comments
# by 高藥師
請問要往下捲動怎麼做?謝謝
# by Jeffrey
to 高藥師,可用 window.scrollTo() 或 page.mouse.wheel() 參考:https://github.com/microsoft/playwright/issues/4302
# by 小黑
自動化測試接觸的少,若想要自動化測試的部分有驗證碼或是OTP,可以如何做?
# by Jeffrey
to 小黑,CAPTCHA 跟 OTP 就是用來防機器人自動化操作的,若測試程式歸你管,最好的做法加機制 Bypass 跳過(但要小心設計,避免被壞人利用)。不然就是用自己的矛戳自己的盾,實在沒必要這樣內耗。