Visual Studio Publish 網站缺檔怎麼辦? 小試 MSBuild 自訂步驟
| | | 0 | |
使用 Visual Studio 發佈( Publish )一個使用 System.Data.SQLite 的 ASP.NET MVC 專案,部署到 IIS 後發生錯誤:
Unable to load DLL 'SQLite.Interop.dll':
The specified module could not be found. (Exception from HRESULT: 0x8007007E)
檢查原因為 Publish 產生 bin 目錄有 System.Data.SQLite.dll 但缺了 x86 跟 x64 資料夾。System.Data.SQLite.dll,需要搭配 x86\SQLite.Interop.dll 及 x64\SQLite.Interop.dll Native 程式庫才能運作。參考
Visual Studio 編譯( Build )時會依據開發環境的作業系統建立 bin/x86、x64 並放入 32/64 位元版 SQLite.Interop.dll,但發佈( Publish )則不會附上 SQLite.Interop.dll,預期由部署人員依伺服器作業系統補上 Native 程式庫, 猜想是 Publish 輸出結果的 bin 目錄只有 System.Data.SQLite.dll 但沒有 x86/x64 資料夾及 SQLite.Interop.dll 的原因。
部署前手動補上是種解法,但確定伺服器為 Windows,我決定把複製檔案的步驟整合進 Publish 程序,感覺更完美。要做到這點,可以從修改 .csproj 下手。
.csproj 可以加入額外的 Target,較為人知的是 BeforeBuild、AfterBuild,在其中放入 Task 即能在編譯前後執行自訂邏輯。 用文字編譯器檢視 .csproj,裡面就有段註解內容提示我們可以自訂 BeforeBuild 及 AfterBuild:
  <!-- To modify your build process, add your task inside one of the targets below and uncomment it.
       Other similar extension points exist, see Microsoft.Common.targets.
  <Target Name="BeforeBuild">
  </Target>
  <Target Name="AfterBuild">
  </Target>
  -->
若不想花太多腦筋,安排個 Task 呼叫 DOS 批次指令將 SQLite.Interop.dll 複製到 Publish 目的資料夾問題就解了。 但這次我想依循 MSBuild 的正統方式完成工作,在 Target 放入 Task 建立 x86/x64 資料夾,並從編譯結果複製 SQLite.Interop.dll 過去。
實測 Publish 不像 Build 有 AfterBuild Target 可指定在編譯後執行,寫 <Target Name="AfterPublish"> 沒用。 但 Target 有個好用 Attribute 叫 AfterTargets,可以指定在某個 Target 執行完畢後觸發。
所以找出將檔案複製到 Publish 目的資料夾的 Target 名稱,緊接它後面執行就好了。
怎麼找呢? MSBuild Log 有線索,開啟 Visual Studio 選項,找到 Project and Solutions / Build and Run / MSBuild projectx build output verbosity,調成 Diagnotics:
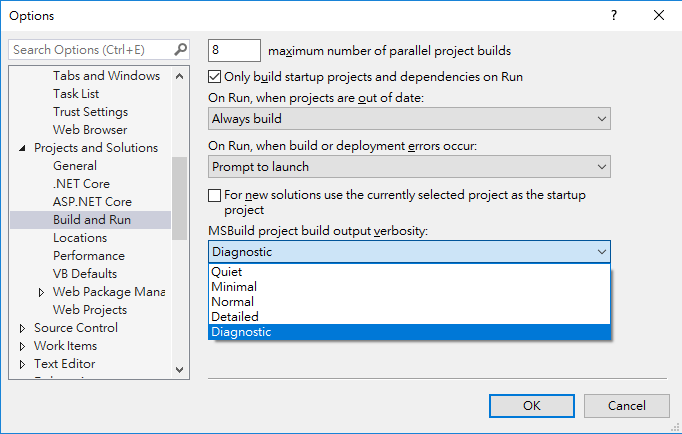
之後再執行一次 Publish,Output 視窗的 Log 資訊變多,從中找到下列線索:
2>        Task "CallTarget"
2>        Task Parameter:RunEachTargetSeparately=False
2>        Done executing task "CallTarget".
2>        Done building target "CopyAllFilesToSingleFolderForPackage" in project "MyProj.csproj".
2>    Target "GatherAllFilesToPublish" in file "C:\Program Files (x86)\Microsoft Visual Studio\
2019\Enterprise\MSBuild\Microsoft\VisualStudio\v16.0\Web\Microsoft.Web.Publishing.targets"
from project "X:\Git\MyProj\MyProj.csproj" (entry point):
2>        Done building target "GatherAllFilesToPublish" in project "MyProj.csproj".
Publish 程序最後一個 Target 的名稱是 GatherAllFilesToPublish,所以我們新增一個<Target Name="CopySQLiteInteropAfterPublish" AfterTargets="GatherAllFilesToPublish">便能在 Publish 複製完檔案後被觸發。
下一個麻煩問題是,我要怎麼知道 Publish 輸出目錄在哪悝? MSBuild 過程有些巨集變數如 $(ProjectDir)、$(PublishDir) 可供利用,若不熟悉, Visual Studio 專案屬性頁的 Build Events / Edit Post-build... 對話框是很好的查詢來源:
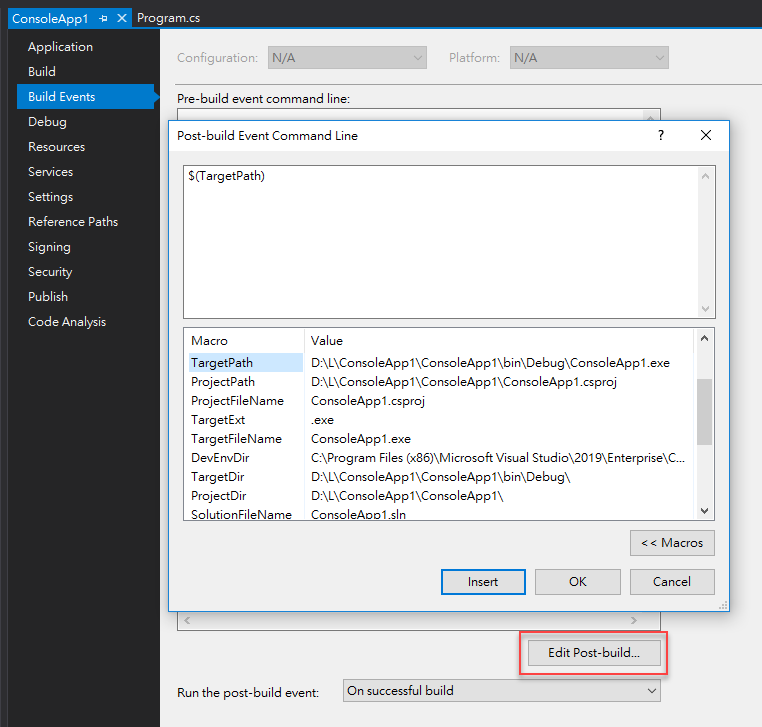
不過在裡面我查不到本案例需要的 Publish 輸出資料夾位置(沒辦法,它不是 Build 會用到的項目),於是再回到 MSBuild Output 找線索:
1>PublishProfileName = FolderProfile
1>PublishProfileRootFolder = X:\GIT\MyProj\Properties\PublishProfiles
1>PublishProvider = FileSystem
1>publishUrl = D:\PublishOutput
1>RebuildDependsOn =
1>      BeforeRebuild;
1>      Clean;
1>      Build;
1>      AfterRebuild;
Bingo! 我找到一個參數 publishUrl 指向 Publish 輸出目錄。
再來是組裝 Task,MSBuild 有各式 Task 可供利用,本次的案例算單純,我用到這兩個:
註:若不想花時間研究 MSBuild 的 Task,如先前所提,可用 Exec Task 呼叫用 Batch 或外部程式解決是條省事的路。(但也喪失了解 MSBuild 的機會)
依據範例,Copy Task 的 SourceFiles 習慣會先用<ItemGroup><Include>定義要複製的檔案項目。
經過一番研究,我寫出笨拙但可以跑的第一版,加在 .csproj 的最後方:
  <!-- ...略
  <Target Name="AfterBuild">
  </Target>
  -->
  <Target Name="CopySQLiteInteropAfterPublish" AfterTargets="GatherAllFilesToPublish">
	<ItemGroup>
		<X86 Include="$(TargetDir)x86\*.*" />
		<X64 Include="$(TargetDir)x64\*.*" />
	</ItemGroup>
	<MakeDir Directories="$(PublishUrl)\bin\x86" Condition="!Exists('$(PublishUrl)\bin\x86')" />
	<Copy SourceFiles="@(X86)" DestinationFolder="$(PublishUrl)\bin\x86" SkipUnchangedFiles="true" />
	<MakeDir Directories="$(PublishUrl)\bin\x64" Condition="!Exists('$(PublishUrl)\bin\x64')" />
	<Copy SourceFiles="@(X64)" DestinationFolder="$(PublishUrl)\bin\x64" SkipUnchangedFiles="true" />
  </Target>
</Project>
做了功課,再找出一些可進化的地方:
- Copy Task 會自己建立資料夾,故 MakeDir 是多餘的。
- <ItemGroup> Include 檔案時,可使用 ** 萬用字元,之後 Copy 時搭配 %(RecursiveDir) Metadata 可在目的地建立相同的資料夾結構。
改良版精簡多了,功能相同:
  <Target Name="CopySQLiteInteropAfterPublish" AfterTargets="GatherAllFilesToPublish">
	<ItemGroup>
		<SQLiteFiles Include="$(TargetDir)**\SQLite.Interop.dll" />
	</ItemGroup>
	<Copy SourceFiles="@(SQLiteFiles)" DestinationFolder="$(PublishUrl)\bin\%(RecursiveDir)"
	      SkipUnchangedFiles="true" />
  </Target>
整理我們在這個案例學到的技巧:
- .csproj 可以加上 Target 搭配 Task 在編譯或發佈時加入自訂步驟(例如:複製檔案、建立資料夾... 等)
- 開啟 VS Project and Solutions / Build and Run / MSBuild projectx build output verbosity 選項,可從 Output 視窗觀察 MSBuild 過程找到線索
- 若要在 Publish 後執行特定工作,可使用
<Target Name="CopySQLiteInteropAfterPublish" AfterTargets="GatherAllFilesToPublish"> - Copy Task 的使用方式,以及 Item Include ** 配合 %(RecursiveDir) 的實用技巧
When using System.Data.SQLite, the native SQLite.Interop.dll are not included in publish output folder. This article introduce how to add a custom Target in csproj to finish this job.
Comments
Be the first to post a comment