電話撥號 DTMF 訊號模擬與識別
 |  | 0 |  |
我當兵時陰錯陽差在通信部隊修了兩年交換機。
說「修」有點浮誇,其實從頭到尾就只會一招,交換機接話機的電路機板上有顆 SLIC (Subscriber Line Interface Circuit) IC,是最容易損壞的元件。遇到單位送修機板,我們的三板斧就只有換掉 SLIC 試試,若沒好一律後送原廠,哈!
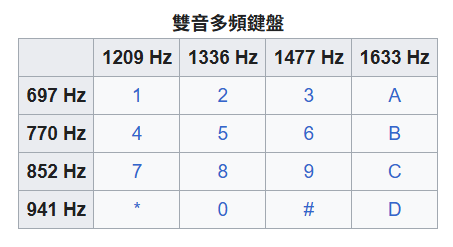
不過,因為這段經歷,我對傳統電話的原理也算略懂。傳統類比電話有個技術叫 Dual-Tone Multi-Frequency 雙音多頻,簡稱 DTMF,它在智慧型手機上還沒絕跡,就是遇到電腦語音「請直接撥分機號碼,或撥 9 由總機為您服務」時用螢幕小鍵盤按鍵發出的不同頻率聲音。遠端的設備可精準地將這些頻率訊號還原對映 1, 2, 3, 4... 等數字或 #、* 字元。
我最近發現一個有趣的 Arduino 零件 - MT8870 模組,50 元有找,用耳機線接收撥號音,MT8870 晶片可將各頻率聲音轉成對應數字或字元的二進位值,省去自己寫濾波器演算法識別的工夫,效率與精準度也高 N 倍。
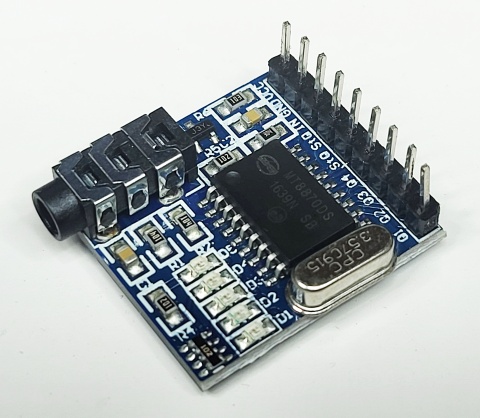
模組上 StD 輸出代表是否目前有按鍵音,D1 到 D4 則分別代表由低到高的 4 個位元,對映 0 ~ 9、#、* 與 A ~ D。音調持續與間隔的最短時間為 40ms ,每秒最可識別按鍵數量的極限值是 12.5 個。
| Digit | Q4 | Q3 | Q2 | Q1 |
|---|---|---|---|---|
| 1 | 0 | 0 | 0 | 1 |
| 2 | 0 | 0 | 1 | 0 |
| 3 | 0 | 0 | 1 | 1 |
| 4 | 0 | 1 | 0 | 0 |
| 5 | 0 | 1 | 0 | 1 |
| 6 | 0 | 1 | 1 | 0 |
| 7 | 0 | 1 | 1 | 1 |
| 8 | 1 | 0 | 0 | 0 |
| 9 | 1 | 0 | 0 | 1 |
| 0 | 1 | 0 | 1 | 0 |
| * | 1 | 0 | 1 | 1 |
| # | 1 | 1 | 0 | 0 |
| A | 1 | 1 | 0 | 1 |
| B | 1 | 1 | 1 | 0 |
| C | 1 | 1 | 1 | 1 |
| D | 0 | 0 | 0 | 0 |
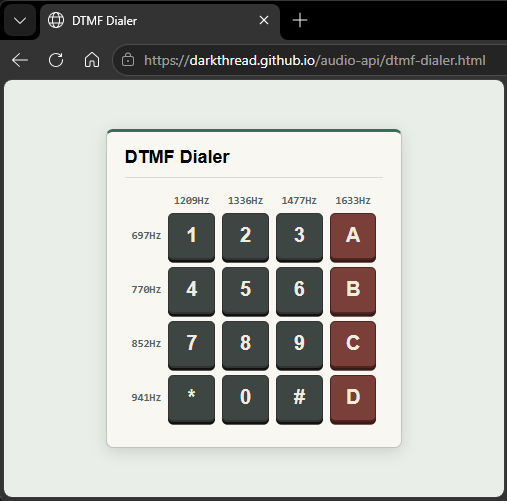
利用先前提過的 Web Audio API,我們可以輕鬆寫出網頁版的電話撥號鍵盤:
<!DOCTYPE html>
<html lang="en">
<head>
  <meta charset="UTF-8">
  <meta name="viewport" content="width=device-width, initial-scale=1.0">
  <title>DTMF Dialer</title>
  <style>
    body {
      margin: 0; min-height: 100vh;
      display: grid; place-items: center;
      font-family: sans-serif;
      background: #e9eee9;
    }
    .dialer {
      padding: 16px 20px 20px;
      border: 1px solid #bcc5bc;
      border-top: 4px solid #3a6b58;
      border-radius: 8px;
      background: #f8f7f1;
      box-shadow: 0 4px 16px rgba(0,0,0,.12);
    }
    .dialer-header {
      display: flex; align-items: center; justify-content: space-between;
      padding-bottom: 10px; margin-bottom: 12px; border-bottom: 1px solid #d9ddd8;
    }
    .dialer-header h1 { margin: 0; font-size: 20px; }
    table { border-collapse: separate; border-spacing: 8px; }
    th, td { padding: 0; text-align: center; }
    .frequency { font: 600 12px/1 monospace; color: #52645e; }
    .dtmf-key {
      width: 52px; height: 52px; padding: 0;
      border: 1px solid #333; border-bottom-width: 3px; border-radius: 6px;
      background: #3d4643; color: #f0ede0;
      font: 700 22px/1 sans-serif; cursor: pointer;
      touch-action: none; user-select: none;
      transition: transform 80ms, box-shadow 80ms;
      box-shadow: 0 3px 0 #111;
    }
    .dtmf-key.fn { background: #7a3f38; border-color: #4e241f; box-shadow: 0 3px 0 #3a1a16; }
    .dtmf-key:hover { filter: brightness(1.15); }
    .dtmf-key:active, .dtmf-key.is-playing {
      border-bottom-width: 1px; transform: translateY(2px); box-shadow: none;
      background: #1e2523;
    }
    .dtmf-key.fn:active, .dtmf-key.fn.is-playing { background: #4e2420; }
    .dtmf-key:focus-visible { outline: 2px solid #1d6eb5; outline-offset: 2px; }
  </style>
</head>
<body>
  <div id="app">
    <div class="dialer" aria-label="DTMF dialer">
      <header class="dialer-header">
        <h1>DTMF Dialer</h1>
      </header>
      <table>
        <thead>
          <tr>
            <th></th>
            <th v-for="c in colFreqs" class="frequency">{{ c }}Hz</th>
          </tr>
        </thead>
        <tbody>
          <tr v-for="(rowFreq, ri) in rowFreqs">
            <th class="frequency">{{ rowFreq }}Hz</th>
            <td v-for="(label, ci) in keys[ri]">
              <button type="button"
                class="dtmf-key" :class="{ 'is-playing': playingKey === `${ri}-${ci}`, fn: ci === 3 }"
                @pointerdown.prevent="startKey($event, `${ri}-${ci}`, rowFreq, colFreqs[ci])"
                @pointerup="stopTone" @pointercancel="stopTone" @lostpointercapture="stopTone"
                @keydown="onKeyDown($event, `${ri}-${ci}`, rowFreq, colFreqs[ci])" @keyup="onKeyUp">
                {{ label }}
              </button>
            </td>
          </tr>
        </tbody>
      </table>
    </div>
  </div>
  <script src="https://unpkg.com/vue@3/dist/vue.global.prod.js"></script>
  <script>
    const LOW_FREQS = [1209, 1336, 1477, 1633];
    const HIGH_FREQS = [697, 770, 852, 941];
    const KEYS = [ ['1', '2', '3', 'A'], ['4', '5', '6', 'B'], ['7', '8', '9', 'C'], ['*', '0', '#', 'D'] ];
    const AudioCtxClass = window.AudioContext || window.webkitAudioContext;
    let audioCtx, activeTone, toneReq = 0;

    const app = Vue.createApp({
      data() {
        return { colFreqs: LOW_FREQS, rowFreqs: HIGH_FREQS, keys: KEYS, playingKey: null };
      },
      methods: {
        stopTone() {
          toneReq++;
          if (!activeTone) return;
          const { oscillators, gain } = activeTone;
          const now = audioCtx.currentTime;
          gain.gain.cancelScheduledValues(now);
          gain.gain.setValueAtTime(gain.gain.value, now);
          gain.gain.linearRampToValueAtTime(0, now + 0.02);
          oscillators.forEach(o => o.stop(now + 0.02));
          this.playingKey = null;
          activeTone = null;
        },
        async playTone(keyId, low, high) {
          if (!AudioCtxClass) return;
          this.stopTone();
          const req = toneReq;
          audioCtx ||= new AudioCtxClass();
          await audioCtx.resume();
          if (req !== toneReq) return;
          const gain = audioCtx.createGain();
          const now = audioCtx.currentTime;
          gain.gain.setValueAtTime(0, now);
          gain.gain.linearRampToValueAtTime(0.12, now + 0.01);
          gain.connect(audioCtx.destination);
          const oscillators = [low, high].map(freq => {
            const osc = audioCtx.createOscillator();
            osc.frequency.value = freq;
            osc.connect(gain);
            osc.start();
            return osc;
          });
          this.playingKey = keyId;
          activeTone = { oscillators, gain };
        },
        startKey(e, keyId, low, high) {
          e.target.setPointerCapture(e.pointerId);
          this.playTone(keyId, low, high);
        },
        onKeyDown(e, keyId, low, high) {
          if ((e.key === ' ' || e.key === 'Enter') && !e.repeat) this.playTone(keyId, low, high);
        },
        onKeyUp(e) {
          if (e.key === ' ' || e.key === 'Enter') this.stopTone();
        }
      },
      mounted()   { window.addEventListener('blur', this.stopTone); },
      unmounted() { window.removeEventListener('blur', this.stopTone); }
    });
    app.mount('#app');
  </script>
</body>
</html>
接著,拿出 ESP 開發板寫幾行程式,我們就能實現用耳機線來傳資料囉~ (灑花)
Explores DTMF dialing tones, the MT8870 decoder module, and a Web Audio API phone keypad demo, then shows how an ESP board can receive tone-encoded data through an audio cable.
Comments
Be the first to post a comment