一行指令建好 Azure VM 跑 HTTPS 網站
| | | 0 | |
這一年來我常在 Azure 開小 VM 架網站做實驗,中小型 ASP.NET Core 架在 Linux Docker 用便宜的 B1s VM綽綽有餘,若有 Visual Studio Enterprise 訂閱或 Azure 學生方案,可以開一堆小 VM 玩到開心。
時至今日,網站走 HTTPS 已是基本要求,我習慣的做法是安裝 Nginx + Certbot 整合 Docker 容器,自動申請 Let's Encrypt TLS 憑證,憑證到期還會自動更新,Fire ad Forget 就是爽。
每次安裝新 VM 都要重覆一長串相同安裝程序讓人心煩,後來我想出 HTTPS Nginx Docker 之懶人安裝法,寫好自動安裝腳本放在 Github,裝好 VM 用 SSH 登入,下指令從 Github 下載腳本執行,喝口茶等上兩三分鐘,一台可以跑 HTTPS 網站的 Docker 主機就準備好了。而這套安裝程序還遺留幾處手動操作:在 Azure Portal 建立 VM、開 80/443 Port 防火牆、SSH 登入貼指令執行。幸好 Azure 所有管理操作都能改用指令完成,並有 Azure CLI 與 Azure PowerShell 兩種選擇,我個人偏好 Azure CLI (延伸閱讀:敲指令管 Azure,該用 Azure CLI 還是 Azure PowerShell?),今天就來舖完這最後一哩路,將整套安裝程序寫成批次指令,實現下一行指令建好 Azure VM 跑 HTTPS 網站!
開始前推薦幾篇文章:
- Quickstart: Create a Linux virtual machine with the Azure CLI - MS Learn
用 Azure CLI 建立 VM 的官方教學 - 使用 Azure CLI 快速建立 Azure 虛擬機器 (Virtual machines) - 保哥
保哥整理的 Azure CLI 建立 VM 常用指令,有查詢 OS 版本、機器規格等實用技巧,必看 - Run scripts in your Windows VM by using action Run Commands
在官方教學學到新技巧 az vm run-command invoke,可以直接丟 Bash 或 PowerShell 指令字串到主機上執行
建 VM、設防火牆等動作很單純,已有現成 Azure CLI 指令。比較複雜的部分是用程式在 VM 上跑 Bash 腳本安裝 Docker Engine 設定 Nginx/Certbot 並建立容器。
Azure CLI 提供兩種在 VM 執行指令的方式:Action RunCommand 與 Managed RunCommand,前者偏向一次性以系統管理者權限執行,後者可包進 ARM 範本、指定執行身分、平行及反覆執行。二者比較如下:
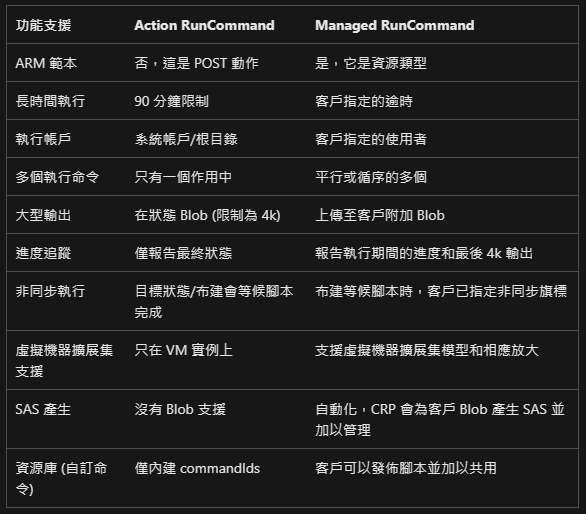
評估後,我選擇較單純的 Action RunCommand,用一行 az vm run-command invoke 解決。以下是個簡單示範,用 az vm run-command invoke --command-id RunShellScript -n B1sVM -g B1sVM_group --scripts "cat /etc/os-release",在回傳 JSON 資料可看到執行結果,也可串接 PowerShell ConvertFrom-Json 擷取內容:

原本的構想是沿用上次做好的 install.sh輕鬆秒殺,但遇到 (TERM is not set, so the dialog frontend is not usable.) 錯誤,研究後發現這個問題也好發於 Docker 製作 Image 過程,apt-get 安裝過程預設會顯示下載進度,在背景非互動環境執行時會出錯,解決方法是設定 DEBIAN_FRONTEND 環境變數或加上 -qq 參數(除非發生錯誤,停用所有訊息輸出),後者感覺較乾淨俐落。由於 install.sh 有多處需要配合背景執行進行修改,我將程式碼改搬進 PowerShell 中,再用點技巧以 && 串成一行指令,最後成品如下:
param(
    [Parameter(Mandatory = $true)]
    [string]$ResourceGroupName,
    [Parameter(Mandatory = $true)]
    [string]$VMName,
    [Parameter(Mandatory = $true)]
    [string]$DnsName,
    [string]$UserName = 'jeffrey',
    [string]$Location = 'eastasia',
    [string]$Email = '<Email address for Let's Encrypt>'
)

# 檢查資源群組是否存在,不存在則建立之
$exist = az group exists -n $ResourceGroupName
if ($exist -eq 'false') {
    az group create -n $ResourceGroupName -l $Location
}

# 輸入密碼
function InputPwd([string]$prompt) {
    $passwd = Read-Host -Prompt $prompt -AsSecureString
    return [Runtime.InteropServices.Marshal]::PtrToStringAuto([Runtime.InteropServices.Marshal]::SecureStringToBSTR($passwd))
}
$pass = $false
while (-not $pass) {
    $passwd = InputPwd "輸入密碼"
    $pwdConfirm = InputPwd "密碼確認"
    if ($passwd -eq $pwdConfirm) {
        $pass = $true
    } else {
        Write-Host "密碼不一致,請重新輸入"
    }
}

# 建立 Debian 11 VM
az vm create -g $ResourceGroupName -n $VMName --public-ip-sku Standard --image Debian11 --admin-username $UserName --admin-password $passwd --size Standard_B1s

# 指定對外 DNS 名稱
if (-not $DnsName) {
    $DnsName = $VMName
}
az network public-ip update -g $ResourceGroupName -n "${VMName}PublicIP" --dns-name $DnsName
$fqdn = "$DnsName.$Location.cloudapp.azure.com"

# 啟用 80 及 443 port
az vm open-port -g $ResourceGroupName -n $VMName --port 80 --priority 300
az vm open-port -g $ResourceGroupName -n $VMName --port 443 --priority 310

$script = @"
# install docker
apt-get -y -qq install ca-certificates curl wget gnupg lsb-release
mkdir -p /etc/apt/keyrings
curl -fsSL https://download.docker.com/linux/debian/gpg | gpg --dearmor -o /etc/apt/keyrings/docker.gpg
echo "deb [arch=`$(dpkg --print-architecture) signed-by=/etc/apt/keyrings/docker.gpg] https://download.docker.com/linux/debian `$(lsb_release -cs) stable" | tee /etc/apt/sources.list.d/docker.list > /dev/null
chmod a+r /etc/apt/keyrings/docker.gpg
apt-get -qq update
apt-get -y -qq install docker-ce docker-ce-cli containerd.io docker-compose-plugin
curl -s https://api.github.com/repos/docker/compose/releases/latest | grep browser_download_url  | grep docker-compose-linux-x86_64 | cut -d '"' -f 4 | wget -qi -
chmod +x docker-compose-linux-x86_64
mv docker-compose-linux-x86_64 /usr/local/bin/docker-compose
usermod -aG docker "$UserName"
systemctl enable docker
# download docker images
docker pull -q staticfloat/nginx-certbot
docker pull -q mcr.microsoft.com/dotnet/samples:aspnetapp
# download /etc/nginx conf files
mkdir /etc/nginx
mkdir /etc/nginx/conf.d
curl -s -o /etc/nginx/nginx.conf https://raw.githubusercontent.com/darkthread/nginx-certbot-docker-nstaller/master/etc/nginx/nginx.conf
curl -s -o /etc/nginx/conf.d/00.default.conf https://raw.githubusercontent.com/darkthread/nginx-certbot-docker-nstaller/master/etc/nginx/conf.d/00.default.conf
curl -s -o /etc/nginx/conf.d/01.aspnetcore.conf https://raw.githubusercontent.com/darkthread/nginx-certbot-docker-nstaller/master/etc/nginx/conf.d/01.aspnetcore.conf
sed -i "s/@fqdn/$fqdn/g" /etc/nginx/conf.d/01.aspnetcore.conf
# copy docker-compose.yml to /home/dockers/nginx-certbot
mkdir -p "/home/dockers/nginx-certbot"
cd "/home/dockers/nginx-certbot"
curl -s -O https://raw.githubusercontent.com/darkthread/nginx-certbot-docker-nstaller/master/dockers/nginx-certbot/docker-compose.yml
sed -i "s/@email/$email/g" docker-compose.yml
# copy docker-compose.yml to /home/dockers/aspnetcore
mkdir -p "/home/dockers/aspnetcore"
cd "/home/dockers/aspnetcore"
curl -s -O https://raw.githubusercontent.com/darkthread/nginx-certbot-docker-nstaller/master/dockers/aspnetcore/docker-compose.yml
# start docker containers
cd "/home/dockers/aspnetcore"
docker-compose up -d
cd "/home/dockers/nginx-certbot"
docker-compose up -d
"@
$lines =  $script.Replace("`r", '').Split("`n") | Where-Object { !$_.StartsWith('#') }
$cmd = ($lines -join ' && ').Replace('"', '""')

# 安裝 Nginx + Certbot Docker
& az vm run-command invoke -g $ResourceGroupName -n $VMName --command-id RunShellScript --scripts "`"$cmd`""
將檔案存成 Az-CreateDebianVM.ps1,未來隨時想建台 VM 玩玩 Web,只需 Az-CreateDebianVM.ps1 TestGroup TestVM my-test-web,輸入管理者密碼,等待...
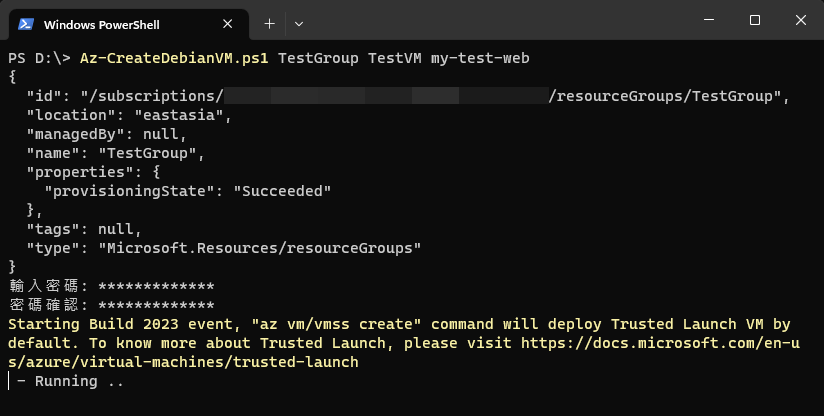
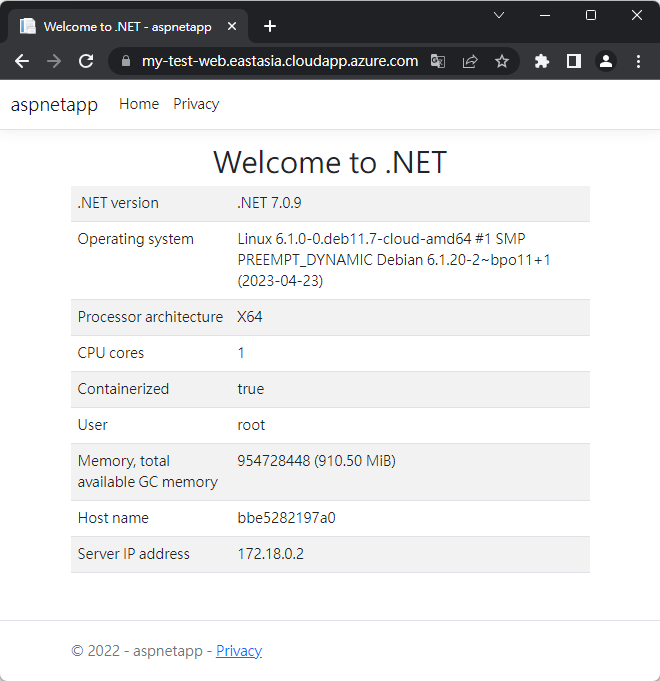
差不多泡一碗泡麵的時間(約五分鐘),便能連上 http:// my-test-web.eastasia.cloundapp.azure.com 驗收成果囉~ 成功。
提醒:安裝程序未包含只開放特定 IP 存取 22 Port,要提升安全性可參考這篇 批次更新 Azure VM 之 RDP/SSH 開放來源 IP。
Example of PowerShell script to create a Azure Debian VM with Nginx+cerbot docker installed and configured in one command line.
Comments
Be the first to post a comment