VS2019 複製貼上彩色程式碼
| | | 4 | |
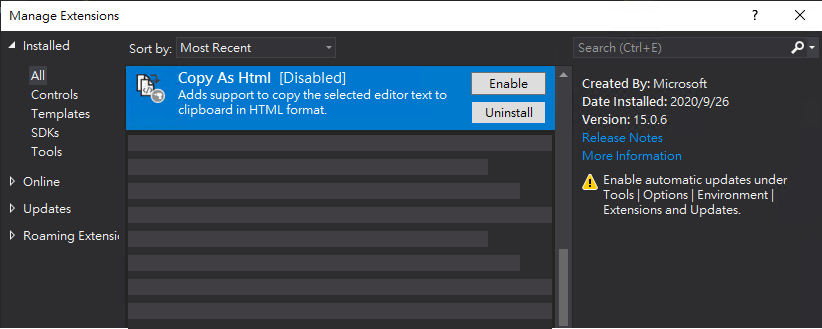
從 Visual Studio 複製程式碼貼到 Word/Outlook/PowerPoint 時保留顏色標示是很常見的需求。很久以前 VS2010 剛推出時複製貼上中文有個 Bug,我還寫了土砲工具解決呢。(謎之聲:可以不要一直想當年嗎?) 之後它一直是 VS 的內建功能,但到 VS2017 時似乎被拿掉,所幸我找到 Microsoft DevLabs 寫的 Copy As HTML 套件上場救援 (Copy As HTML 也含在 Productivity Power Tools 2017/2019 裡),使用起來倒也沒啥問題。
但從某個 VS2019 版本起,複製程式碼時常會導致 Visual Studio 凍結沒反應,爬文發現我不孤單,停用它複製功能才恢復正常。
忍受貼黑白程式碼或改從 VSCode 複製好一陣子,今天決心找出解法。爬文發現 Visual Studio 有個很少人討論的選項:(我查到最的討論在 2019,說不定一開始就存在)
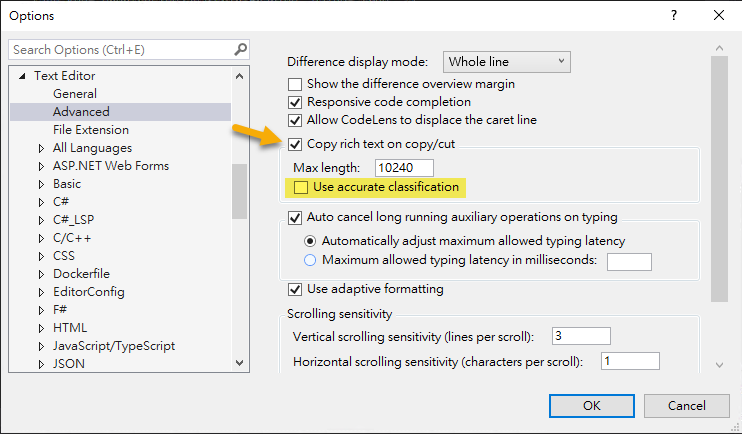
啟用 「Copy rich text on copy/cut」後,VS2019 就能複製貼上彩色程式碼了,至於下方的「Use accurate classifition」選項,官方文件沒提供 Advanced 類設定的說明,我只在這篇 Copy and paste C++ source into Word loses formatting 討論找到微軟 RD 的回覆:
Language services typically provide 2 kinds of colorization – quick syntactic colorization and rich but slower semantic colorization (e.g. user types). This way a newly opened file is already colorized based on syntax, but once semantic information becomes available, richer colorization appears. So when this checkbox is checked, Copy/Cut commands would copy accurate, final colors even if calculating those would take more time (a wait dialog will be shown after 2s).
The document for the Tools/Options/Text Editor/Advanced page are in progress....
大意是 Language Service 提供快速及完整兩種語意色彩標示,勾選「Use accurate classifition」會等待完整色彩標示 OK 再複製,會多等個兩秒。(另外也有提到 Advanced 部文件來不及寫的事)
不過 VS2019 複製貼上的程式碼一律採用白色背景(不管 IDE 是否設定深色主題),適合 Word/Outlook;若想沿用深色背景樣式放在深色底投影片上,可考慮改用 VSCode,或用 Copy As HTML 套件加自訂樣式[參考]。
Tips of enable "Copy rich text on copy/cut" option to copy syntax high-lighted code from VS2019.
Comments
# by 菜雞工程師
最近也會先貼到Notepad++ 先用 設定>設定程式語言格式>選取主題(挑順眼的) 再用 外掛>NppExport>Copy all formats to clipboard 有點麻煩但熟悉之後可變性很高XD
# by Jeffrey
to 菜雞工程師,謝謝分享,又學到一招。
# by 4
#define uS_TO_S_FACTOR 1000000 /* Conversion factor for micro seconds to seconds */ #define TIME_TO_SLEEP 1 /* Time ESP32 will go to sleep (in seconds) */ #define BLINK_GPIO_1 GPIO_NUM_26 RTC_DATA_ATTR int Count = 0; #include "esp_sleep.h" #include "soc/rtc_cntl_reg.h" #include "soc/rtc.h" #include "driver/rtc_io.h" int YELLOW_LED_PIN = 26;//<---藍色燈 void setup(){ pinMode(YELLOW_LED_PIN,OUTPUT); Serial.begin(115200); // delay(1000); if(Count == 0) { digitalWrite(YELLOW_LED_PIN,HIGH); Serial.println("on"); Count = Count+1; gpio_deep_sleep_hold_en(); }else { //digitalWrite(YELLOW_LED_PIN,LOW);//不會作用 Serial.println("off"); Count--; gpio_deep_sleep_hold_dis(); } /*if(light==1){ digitalWrite(YELLOW_LED_PIN,HIGH); Serial.println("YELLOW_LED_PIN,HIGH"); light--; } else{ digitalWrite(YELLOW_LED_PIN,LOW); Serial.println("YELLOW_LED_PIN,LOW"); light++; } */ esp_sleep_enable_timer_wakeup(TIME_TO_SLEEP * uS_TO_S_FACTOR); esp_deep_sleep_start(); } void loop(){ //digitalWrite(YELLOW_LED_PIN,HIGH); //Serial.println("YELLOW_LED_PIN,HIGH"); } /*只有"YELLOW_LED_PIN,HIGH" int light=turn_off; void setup(){ pinMode(YELLOW_LED_PIN,OUTPUT); Serial.begin(115200); // delay(1000); } void loop(){ if(light==turn_off){ digitalWrite(YELLOW_LED_PIN,HIGH); Serial.println("YELLOW_LED_PIN,HIGH"); light=turn_on; } else{ digitalWrite(YELLOW_LED_PIN,LOW); Serial.println("YELLOW_LED_PIN,LOW"); light=turn_off; } esp_sleep_enable_timer_wakeup(TIME_TO_SLEEP * uS_TO_S_FACTOR); esp_deep_sleep_start(); }*/ //最原版 //#define uS_TO_S_FACTOR 1000000 /* Conversion factor for micro seconds to seconds */ //#define TIME_TO_SLEEP 3 /* Time ESP32 will go to sleep (in seconds) */ //RTC_DATA_ATTR int bootCount = 0; /* int GREEN_LED_PIN = 25; int YELLOW_LED_PIN = 26; void setup(){ pinMode(GREEN_LED_PIN,OUTPUT); pinMode(YELLOW_LED_PIN,OUTPUT); Serial.begin(115200); delay(500); if(bootCount == 0) //Run this only the first time { digitalWrite(YELLOW_LED_PIN,HIGH); Serial.println("YELLOW_LED_PIN,HIGH"); bootCount = bootCount+1; }else { digitalWrite(GREEN_LED_PIN,HIGH); Serial.println("GREEN_LED_PIN,HIGH"); } delay(3000); digitalWrite(GREEN_LED_PIN,LOW); digitalWrite(YELLOW_LED_PIN,LOW); Serial.println("GREEN_LED_PIN + YELLOW_LED_PIN,HIGH"); esp_sleep_enable_timer_wakeup(TIME_TO_SLEEP * uS_TO_S_FACTOR); esp_deep_sleep_start(); }*/
# by AAA
print("計算平均的程式:") total = int(input("輸入總和:")) count = int(input("輸入個數:")) print("答案:", total / count)