Coding4Fun - 用 C# / PowerShell 為線上照片產生超精巧預覽圖庫
 |  | 0 |  |  |
我想為放在網路圖床的照片建立預覽圖庫,需要輸入照片連結時,方便看縮圖挑照片得到連結網址。如果要自己寫程式來做,一般人直覺會建個資料表或 JSON 檔,關聯照片縮圖檔名與來源網址,再寫個照片瀏覽介面,點選照片縮圖時帶出原圖連結。
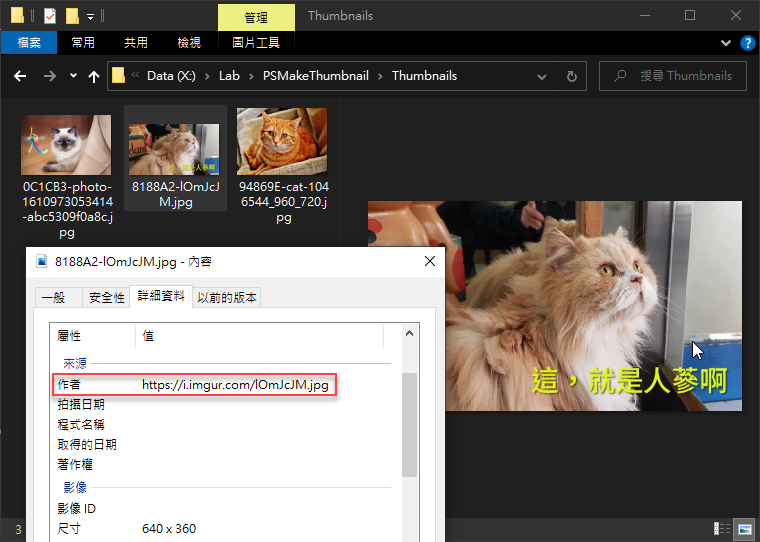
但,我有個大膽的想法 - 不要資料庫也不要搞 JSON,不用寫照片瀏覽介面,把原始連結藏在預覽 JPEG 檔的 EXIF 資訊,如此可直接用檔案總管瀏覽、管理,看到喜歡的照片,按右鍵從檔案內容/詳細資料複製來源網址,這樣才超符合 KISS (Keep It Simple, Stupid) 美學!
先看成果,我將照片轉成 640x640 以下的縮圖 JPG,用檔案總管或任何看圖軟體可直接瀏覽,按右鍵開啟內容視窗,來源網址就在詳細資料的作者欄。

要完成這項工作,我需要一個批次作業程式,讀入 URL 清單,決定唯一檔名,下載照片轉縮圖,將來源網址存入 EXIF 標籤,搞定收工。程式不難,只有幾項技術細節值得一值:
- 來源網址的檔名部分有可能重複,但縮圖檔名必須唯一。我的解法是用來源網址產生 MD5 雜湊碼,取前六碼加檔名組成唯一檔名,用雜湊而非亂數或時間標籤的理由是同一 URL 產生的檔名永遠相同,未來能以此判斷縮圖是否已存在。
- 原本還煩惱要怎麼產生縮圖,後來發現 .NET 已內建 System.Drawing.Image.GetThumbnailImage(),省下自幹或找元件的工夫。依原比例決定縮圖寬高的部分得自己算,但邏輯不難,加幾行就可搞定。
- JPEG 格式可加入標題、相機型號、光圈快門、作者等額外資料,術語叫 EXIF,NuGet 上有現成 ExifLibNet 套件,ExifLibrary.ImageFile.FromFile("...") 讀取檔案,.Properties.Set(ExifLibrary.ExifTag.Artist, "...") 設定,.Save("...") 儲存,前人種樹我乘涼,偉哉開源社群。
決定好做法,用 C# 或 PowerShell 實現只在彈指之間。我這裡用 PowerShell 示範:
Add-Type -Path .\ExifLibrary.dll
Add-Type -AssemblyName System.Drawing
$ErrorActionPreference = 'STOP'
function GetMD5Hash([string]$str) {
    # 輸入任意字串產生 MD5 雜湊
    $stringAsStream = [System.IO.MemoryStream]::new()
    $writer = [System.IO.StreamWriter]::new($stringAsStream)
    $writer.write($str)
    $writer.Flush()
    $stringAsStream.Position = 0
    Get-FileHash -InputStream $stringAsStream -Algorithm MD5 | Select-Object -ExpandProperty Hash
    $writer.Dispose()
    $stringAsStream.Dispose()
}

function CreateThumbnail([string]$srcPath, [string]$thumbnailPath, [int]$thumbnailSize, [string]$author) {
    [System.Drawing.Image]$srcImg = [System.Drawing.Image]::FromFile($srcPath)
    # 以縮圖尺寸上限計算縮放比例
    $ratio = 1
    if ($srcImg.Width -gt $srcImg.Height) {
        if ($srcImg.Width -gt $thumbnailSize) {
            $ratio = [float]$thumbnailSize / $srcImg.Width
        }
        elseif ($srcImg.Height -gt $thumbnailSize) {
            $ratio = [float]$thumbnailSize / $srcImg.Height
        }
    }
    # 計算縮圖寬高
    $thumbWidth = [System.Convert]::ToInt32($srcImg.Width * $ratio)
    $thumbHeight = [System.Convert]::ToInt32($srcImg.Height * $ratio)
    [System.Drawing.Image]$thumbnail = $srcImg.GetThumbnailImage($thumbWidth, $thumbHeight,{ param() $false }, [Intptr]::Zero)
    $thumbnail.Save($thumbnailPath, [System.Drawing.Imaging.ImageFormat]::Jpeg);
    $srcImg.Dispose()
    $thumbnail.Dispose()
    # 呼叫 ExifLibNet 元件在 EXIF 標籤寫入作者資訊
    [ExifLibrary.ImageFile]$file = [ExifLibrary.ImageFile]::FromFile($thumbnailPath)
    $file.Properties.Set([ExifLibrary.ExifTag]::Artist, $author)
    $file.Save($thumbnailPath)
}

$resFolder = "$PSScriptRoot\Thumbnails"
[System.IO.Directory]::CreateDirectory($resFolder) | Out-Null

Get-Content urls.txt | ForEach-Object {
    $url = $_
    $imgFileName = [System.IO.Path]::GetFileName($url.Split('?')[0].Split('#')[0])
    $hash = (GetMD5Hash $url).Substring(0, 6)
    $fullFileName = $hash  + "-" + $imgFileName
    $srcImgPath = Join-Path $resFolder $fullFileName
    Invoke-WebRequest -Uri $url -OutFile $srcImgPath
    $thumbnailPath = Join-Path $resFolder ($hash + "-" + [System.IO.Path]::GetFileNameWithoutExtension($imgFileName) + ".thumbnail.jpg")
    CreateThumbnail $srcImgPath $thumbnailPath 640 $url
    Remove-item $srcImgPath
    Move-Item $thumbnailPath $thumbnailPath.Replace('.thumbnail.jpg', '.jpg') -Force
}
想出內嵌 EXIF 這招,不需額外資料庫或資料檔,也省去寫瀏覽介面,不愧是 KISS 哲學的充分實踐,又一件得意作品,哈!
Example of downloading photos, converting thumbnail and setting EXIF by C#/PowerShell.
Comments
Be the first to post a comment