.NET RSA 公私鑰加密與簽章完整範例
| | | 0 | |
這篇主要寫給自己未來參考,整理一份 RSA 公私鑰加解密及數位簽章的 .NET 程式範例,滿足以下應用場景:
- 同時考量 .NET Framework 與 .NET Core/.NET 6+、Windows、Linux 等不同 .NET 版本及作業系統平台
- 老 .NET Framework 專案續用 System.Security.Cryptography.RSACryptoServiceProvider (依賴 Windows CAPI),相關資源多
- 新 .NET 專案改用 BouncyCastle 開源程式庫,跨平台及支援完整度較好
參考:使用 Bouncy Castle DES/AES 加解密 - 公私鑰需可匯出 PEM 格式方便交換、保存
- 支援 RSACryptoServiceProvider 與 BouncyCastle 互通,共用公私鑰 PEM,解密另一方加密內容及驗證對方產生的數位簽章
我定義了簡單介面,分別用 RSACryptoServiceProvider 及 BouncyCastle 實作,提供兩種建構式,new 物件時隨機產生公私鑰或傳入 PEM 字串使用既有公私鑰,類別有屬性可讀取公私鑰(使用 PEM 格式字串),並提供加密、解密、產生簽章及驗證簽章等方法:
public interface IRsaCrypto
{
    string PubKey { get; }
    string PrivKey { get; }
    byte[] Encrypt(byte[] plainData);
    byte[] Decrypt(byte[] cipherData);
    byte[] Sign(byte[] data);
    bool Verify(byte[] data, byte[] signature);
}
開發過程復習跟學到一些東西:
- 上回踩過的問題,NuGet 上相似的 BouncyCastle 套件很多,請認明 Portable.BouncyCastle,勿裝錯
- 為確保 BouncyCastle 跟 RSACryptoServiceProvider 互通,兩邊的加密演算法需一致。我在 RSACryptoServiceProvider.Encrypt() 時 fOAEP 參數設 false,使用 PKCS#1 1.5 Padding、SignData() 時則指定 SHA256;BouncyCastle 執行加解密跟簽章時要指定演算法則分別選用 SHA-256withRSA 及 RSA/ECB/PKCS1Padding。
- RSA 加密時不管使用 OAEP 或 PKCS#1 Padding,都會填充隨機內容,故同一字串每次加密的結果都不同。參考
- RSACryptoServiceProvider 要匯入 PEM 格式金鑰,BouncyCastle 有提供 DotNetUtilities 工具,但匯出很麻煩得自己拼裝字串,過程瑣碎繁雜,幸好已有前輩佛心寫好現成函式範例可直接引用。
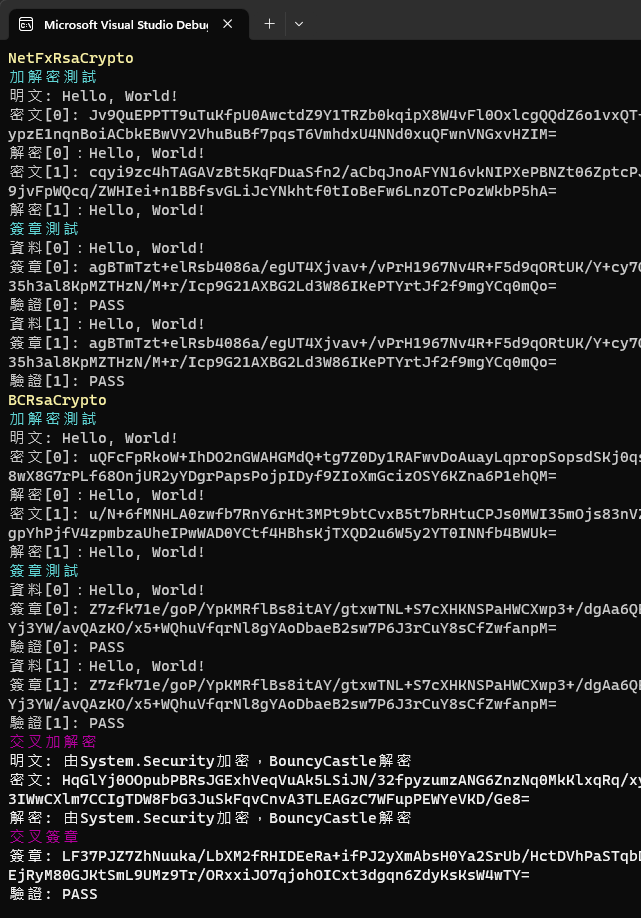
以下是測試程式,分別用 RSACryptoServiceProvider、BouncyCastle 執行同一字串加解密兩次(可觀察到兩次加密結果不同)、簽章及驗證兩次(兩次簽章結果一致);最後測試用 RSACryptoServiceProvider 加密及簽章,用 BoncyCastle 解密及驗證,做法是由 NetFxRsaCrypto 匯出公私鑰 PEM,以 new BCRsaCrypto(fxRsaCrypto.PubKey, fxRsaCrypto.PrivKey) 建構使用相同公私鑰的 BouncyCastle 加解密物件:
using System.Text;
using DotNetRsaExample;

Action<IRsaCrypto> RunTest = (crypto) =>
{
    Print(crypto.GetType().Name, ConsoleColor.Yellow);
    Print("加解密測試", ConsoleColor.Cyan);
    var plainText = "Hello, World!";
    var plainData = Encoding.UTF8.GetBytes(plainText);
    Console.WriteLine($"明文: {plainText}");
    byte[] cipherData = null!;
    for (var i = 0; i < 2; i++)
    {
        // PKCS#1 / OAEP 加密時會填充一些亂數,故每次加密結果不會相同
        // https://en.wikipedia.org/wiki/RSA_(cryptosystem)#Padding_schemes
        cipherData = crypto.Encrypt(plainData);
        Console.WriteLine($"密文[{i}]: {Convert.ToBase64String(cipherData)}");
        var decryptedData = crypto.Decrypt(cipherData);
        Console.WriteLine($"解密[{i}]:{Encoding.UTF8.GetString(decryptedData)}");
    }
    Print("簽章測試", ConsoleColor.Cyan);
    for (var i = 0; i < 2; i++)
    {
        Console.WriteLine($"資料[{i}]:{plainText}");
        var signature = crypto.Sign(plainData);
        Console.WriteLine($"簽章[{i}]: {Convert.ToBase64String(signature)}");
        var verified = crypto.Verify(plainData, signature);
        Console.WriteLine($"驗證[{i}]: {(verified ? "PASS" : "FAIL")}");
    }
};

var fxRsaCrypto = new NetFxRsaCrypto();
RunTest(fxRsaCrypto);
var bcRsaCrypto = new BCRsaCrypto();
RunTest(bcRsaCrypto);

// 使用既有 PubKey 或 PrivKey 建立 BCRsaCrypto 的三種做法
// 1. BCRsaCrypto.FromPubKey(pubKey)
// 2. BCRsaCrypto.FromPrivKey(privKey)
// 3. new BCRsaCrypto(pubKey, privKey)

Print("交叉加解密", ConsoleColor.Magenta);
string plainText = "由System.Security加密,BouncyCastle解密";
Print($"明文: {plainText}");
var enc = fxRsaCrypto.Encrypt(Encoding.UTF8.GetBytes(plainText));
Print($"密文: {Convert.ToBase64String(enc)}");
Print($"解密: {Encoding.UTF8.GetString(BCRsaCrypto.FromPrivKey(fxRsaCrypto.PrivKey).Decrypt(enc))}");
Print("交叉簽章", ConsoleColor.Magenta);
var sign = fxRsaCrypto.Sign(Encoding.UTF8.GetBytes(plainText));
Print($"簽章: {Convert.ToBase64String(sign)}");
Print($"驗證: {(BCRsaCrypto.FromPubKey(fxRsaCrypto.PubKey).Verify(Encoding.UTF8.GetBytes(plainText), sign) ? "PASS" : "FAIL")}");

void Print(string msg, ConsoleColor color = ConsoleColor.White)
{
    Console.ForegroundColor = color;
    Console.WriteLine(msg);
    Console.ResetColor();
}
測試成功!

範例專案已上傳 Github,有需要的同學可自取參考,大家如發現問題歡迎回饋給我。
This article demonstrates the use of RSACryptoServiceProvider and BouncyCastle API for encryption and decryption and signing, and implements shared keys and mutual verification.
Comments
Be the first to post a comment