輕前端筆記 - 使用 Vue SFC (.vue 元件)
 |  | 1 |  |
前幾天提到在 ASP.NET 使用輕前端 整合 Vue.js 做 MVVM,若遇到伺服端元件輸出 script/style 的注意事項。FB 留言區 Died Liu 分享透過 defineAsyncComponent 方法載入 .vue 元件檔的做法,不需要 npm、webpack 也能享受用 .vue 封裝元件邏輯的好處,讓我十分心動。
複雜的前端自訂元件,通常會包含 HTML 模板、JavaScript 程式跟 CSS 樣式,最理想做法是將該元件需要的東西放在一起,引用時一個檔案搞定,如此能簡化開發、測試及部署複雜度,較符合模組化設計。Vue.js 也有這種單檔元件 (Single File Component,SFC) 概念,副檔名為 .vue,格式如下,將 HTML 模板、JavaScript 程式及 CSS 樣式分別放入 <tempalte>、<script>、<style> 存成 .vue 檔案:
<script>
export default {
  data() {
    return {
      greeting: 'Hello World!'
    }
  }
}
</script>

<template>
  <p class="greeting">{{ greeting }}</p>
</template>

<style>
.greeting {
  color: red;
  font-weight: bold;
}
</style>
不過,之前看到的範例,要用 SFC 都需要結合 JavaScript Module (起手式是 import MyComponent from './MyComponent.vue') 配合 Vue CLI、webpack 打包使用,我一直覺得輕前端與它無緣。所以,當看到 createApp 時 import('./some.vue') 寫法,我眼睛為之一亮。
createApp({ /*...*/
  components: {
      AsyncComponent: defineAsyncComponent(() => import('./components/AsyncComponent.vue'))
  }
})
經過一番研究與摸索,總算試出輕前端使用 .vue 的方法。由於 SFC 的獨有格式必須先經過解析轉譯成 JavaScript 程式碼,才能在瀏覽器執行,Vue CLI 打包部署時會使用 vue-loader 進行轉譯;輕前端要從瀏覽器直接載入 .vue,則需依賴第三方程式庫 vue3-sfc-loader進行前置處理。參考
vue3-sfc-loader 使用範例如下:
<!DOCTYPE html>
<html>

<body>
    <div id="app">
        <drk-timer secs="20"></drk-timer>
        <drk-timer></drk-timer>
    </div>
    <script src="https://unpkg.com/vue@next"></script>
    <script src="https://cdn.jsdelivr.net/npm/vue3-sfc-loader"></script>
    <script>
        const options = {
            moduleCache: { vue: Vue },
            async getFile(url) {
                //if (url === '/myComponent.vue')
                //    return Promise.resolve(vueString);
                const res = await fetch(url);
                if (!res.ok)
                    throw Object.assign(new Error(url + ' ' + res.statusText), { res });
                return await res.text();
            },
            addStyle(textContent) {
                const style = Object.assign(document.createElement('style'), { textContent });
                const ref = document.head.getElementsByTagName('style')[0] || null;
                document.head.insertBefore(style, ref);
            },
            log(type, ...args) { console[type](...args); },
            compiledCache: {
                set(key, str) {
                    // naive storage space management
                    for (; ;) {
                        try {
                            // doc: https://developer.mozilla.org/en-US/docs/Web/API/Storage
                            window.localStorage.setItem(key, str);
                            break;
                        } catch (ex) {
                            // handle: Uncaught DOMException: Failed to execute 'setItem' on 'Storage': Setting the value of 'XXX' exceeded the quota
                            window.localStorage.removeItem(window.localStorage.key(0));
                        }
                    }
                },
                get(key) {
                    return window.localStorage.getItem(key);
                },
            }
        }
        const { loadModule } = window['vue3-sfc-loader'];
        var vm = Vue.createApp({
            components: {
                drkTimer: Vue.defineAsyncComponent(() => loadModule('./timer.vue', options))
            }
        }).mount('#app');
    </script>
</body>

</html>
使用 vue3-sfc-loader 時要先宣告一個 options 物件,其中包含:
- moduleCache 屬性
一般寫 即可 - getFile() 方法
依 url 取回 .vue 內容,也可用其他方法傳回字串,不一定要從伺服器下載。這段自訂邏輯非常好用,提供無限的擴充彈性,例如:正式上線時可打包多個 .vue 一次下載,減少 HttpRequest 次數 - addStyle() 方法
決定如何將 <style<區塊內容掛到目前的網頁 - log()
訊息輸出方式 - compiledCache
將編譯結果存入 localStorage 重複使用以提升效能
要載入 .vue 的地方則寫成:
components: {
    drkTimer: Vue.defineAsyncComponent(() => loadModule('./timer.vue', options))
}
我寫了一個倒數計時器當練習:
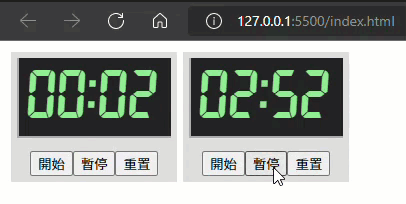
我人生第一個 .vue 檔,HTML、JavaScript 跟 Style 氣刀體一致的感覺真棒!
<template>
  <div class="timer" v-bind:class="[status]">
    <div class="screen">{{ mm }}:{{ ss }}</div>
    <div class="buttons">
      <button @click="start()">開始</button>
      <button @click="pauseOrResume()">
        {{ status == "P" ? "繼續" : "暫停" }}
      </button>
      <button @click="reset()">重置</button>
    </div>
  </div>
</template>
<script>
export default {
  name: "drk-timer",
  props: ["secs"],
  data() {
    return {
      //W-Waiting, R-Running, P-Paused, O-Timeout
      status: "W",
      lastTime: 0,
      totalTime: 0,
      countdownSecs: 0,
      intHandle: 0,
    };
  },
  computed: {
    remainingSecs() {
      if (!this.countdownSecs) return 0;
      return Math.max(
        0,
        this.countdownSecs - Math.round(this.totalTime / 1000)
      );
    },
    mm() {
      return Math.floor(this.remainingSecs / 60)
        .toString()
        .padStart(2, "0");
    },
    ss() {
      return (this.remainingSecs % 60).toString().padStart(2, "0");
    },
  },
  watch: {
    secs() {
      this.start();
    },
  },
  methods: {
    start() {
      this.reset();
      this.status = "R";
    },
    pauseOrResume() {
      if (this.status == "R") this.status = "P";
      else if (this.status == "P") {
        //resume
        this.lastTime = new Date().getTime();
        this.status = "R";
      }
    },
    reset() {
      this.lastTime = new Date().getTime();
      this.totalTime = 0;
      this.status = 'W';
    },
    tick() {
      if (this.status == "R") {
        const currTime = new Date().getTime();
        this.totalTime += currTime - this.lastTime;
        this.lastTime = currTime;
      }
      if (this.mm + this.ss == 0) {
        this.status = "O";
      }
    },
  },
  mounted() {
    this.countdownSecs = parseInt(this.secs);
    if (!this.countdownSecs) this.countdownSecs = 180;
    this.intHandle = setInterval(this.tick, 500);
  },
  unmounted() {
    clearInterval(this.intHandle);
  },
};
</script>
<style scoped>
.W .screen { color: white; }
.R .screen { color: lightgreen; }
.P .screen { color: #888; }
.O .screen { color: rgb(255, 7, 7); }
.timer {
  display: inline-block; margin: 3px;
  background-color: #ddd;
}
.buttons { padding: 6px; text-align: center; }
@font-face {
  /* https://torinak.com/font/7-segment */
  font-family: "7segments"; font-weight: 200; font-style: normal;
  src: url("data:application/font-woff;base64,d09GRgABAAAAA...略...LAAACxFAeMA") format("woff");
}
.screen {
  font-family: "7segments"; font-size: 64px; width: 140px;
  margin: 6px; padding: 6px; background-color: #222;
  border: 2px solid #aaa; border-style: none none solid solid;
}
</style>
打通在輕前端用 .vue 寫元件的關卡,元件模板及程式不用硬塞進 .js,連樣式都能放在一起,回到文明的開發方式,感覺前進了一大步,讚!!
(範例已上傳到 Github)
Tips of how to load and use .vue SFC directly from browser.
Comments
# by GM
早期我也是用vue2-sfc-loader,升上vue3時一開始也是沿用vue3-sfc-loader,但後來遇上問題(細節我忘了,反正找了半天發現問題是vue3-sfc-loader载入.vue失敗)。自己就搞了奇怪的純JS載入法.... $.ajax({ method: "get", url:`../VueComponent/swd.vue` ,async:false }) .done(function( retData ) { $("body").append(retData); }); const app = Vue.createApp({ }); //將元件加入vue app app.component('swd-page-ctrl', swd_page_ctrl); ----------------------------------------------------------------- swd.vue: <script type="text/x-template" id="swd-page-ctrl-template"> .... </script> <style> .... } </style> <script> var swd_page_ctrl={ template: '#swd-page-ctrl-template' ,props:{'s-show-data-list':Array,'s-data-source':Array,'s-rows-of-page':Number,'s-rows-page-list':Array ,'s-page-list-length':Number,'s-id':String,'s-order-cols':Array,'s-sys-id':String}//propB: [String, Number] ,data(){ } ,mounted(){ } ,methods:{ } }; </script>