用VisualTreeHelper解剖Silverlight視覺元素
 |  | 0 |  |
Siverlight依賴範本(Template)決定視覺呈現內容,如TextBox、ListBox等這些常用的控制項,背後都是依著預設範本,由Border、Grid、ScrollViewer... 等組裝出來的。
VisualTreeHelper是個有趣工具,可以在執行期間解析視覺化元素的組成結構。GetChildrenCount可以找出元素包含幾個子元素、GetChild則可把第n個子元素挑出來。嘿! 有靈感了嗎? 光這兩個Method再配合上遞迴,就可以協助我們把一個Silverlight物件的整個視覺化結構解析出來。
好,今天就來找隻青蛙解剖一下吧! 首先,大家可以先到MSDN查一下控制項樣式與範本,裡面有各控制項預設的範本(Template),算是生理構造圖,可以跟我們剖析出來的結果相互對照。而我們今天挑的這隻小青蛙是做UI不可或缺的好朋友--TextBox!
以下是我的實驗。XAML中放了兩個TextBox,txtBox1是被解剖的對象,txtXml則用來顯示結果,btnShow則用來觸發分析程序。
<UserControl x:Class="SLInterop.VisualTree"
xmlns="http://schemas.microsoft.com/winfx/2006/xaml/presentation"
xmlns:x="http://schemas.microsoft.com/winfx/2006/xaml"
xmlns:d="http://schemas.microsoft.com/expression/blend/2008"
xmlns:mc="http://schemas.openxmlformats.org/markup-compatibility/2006"
mc:Ignorable="d"
d:DesignHeight="300" d:DesignWidth="400">
<Grid x:Name="LayoutRoot" Background="White">
<Grid.RowDefinitions>
<RowDefinition Height="50" />
<RowDefinition Height="*" />
</Grid.RowDefinitions>
<TextBox Grid.Row="1" Name="txtXml"
HorizontalAlignment="Stretch" VerticalAlignment="Stretch"
TextWrapping="Wrap" Margin="5"
VerticalScrollBarVisibility="Auto"
HorizontalScrollBarVisibility="Auto"></TextBox>
<TextBox Height="23" HorizontalAlignment="Center" Name="textBox1"
VerticalAlignment="Center" Width="120" />
<Button Content="Show Tree" Height="23" HorizontalAlignment="Left"
Margin="5,5,0,0" Name="btnShow" VerticalAlignment="Top" Width="75"
Click="btnShow_Click" />
</Grid>
</UserControl>
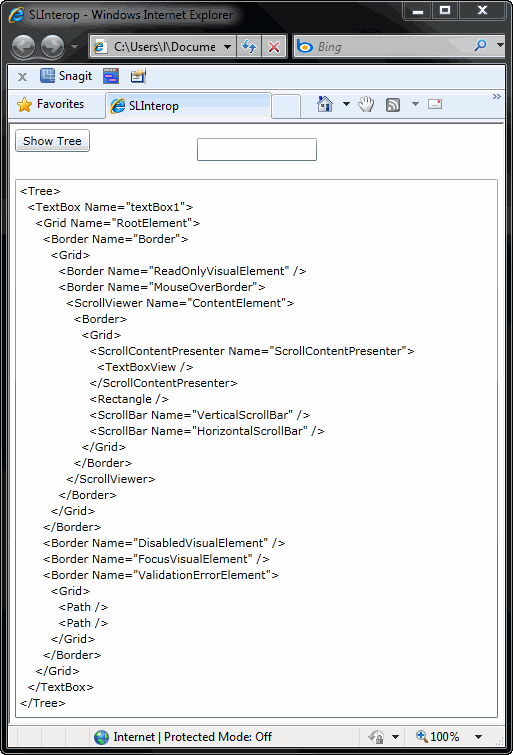
程式碼很簡單,exploreTree利用遞迴的方式,透過GetChildrenCount及GetChild走過所有元素組成,再把它轉為XML,顯示在txtXml。
using System.Linq; using System.Windows; using System.Windows.Controls; using System.Windows.Media; using System.Xml.Linq; namespace SLInterop { public partial class VisualTree : UserControl
{ public VisualTree() { InitializeComponent();
}
//以遞迴方式探索整個Visual Tree private XElement exploreTree(FrameworkElement c) { //取得型別名稱不含Namespace string compactTypeName = c.GetType().ToString().Split('.').Last(); //建立XML元素 XElement xe = new XElement(compactTypeName); //有Name時,加為XML Attribute if (!string.IsNullOrEmpty(c.Name))
xe.Add(new XAttribute("Name", c.Name));
//逐一將Visual Tree子元素加為XML子元素 for (int i = 0;
i < VisualTreeHelper.GetChildrenCount(c);
i++)
{ var child = VisualTreeHelper.GetChild(c, i)
as FrameworkElement; if (child == null) continue;
xe.Add(exploreTree(child));
}
//傳回XML元素 return xe; }
//將指定視覺物件轉成XML後顯示出來 private void btnShow_Click(object sender, RoutedEventArgs e)
{ XDocument xd = XDocument.Parse("<Tree />"); xd.Root.Add(exploreTree(textBox1));
txtXml.Text = xd.ToString();
}
}
}
執行結果如下:

我們跟MSDN文件對照一下:
<Border x:Name="Border" ...>
<Grid>
<Border x:Name="ReadOnlyVisualElement" .../>
<Border x:Name="MouseOverBorder" ...>
<ScrollViewer x:Name="ContentElement" .../>
</Border>
</Grid>
</Border>
<Border x:Name="DisabledVisualElement" .../>
<Border x:Name="FocusVisualElement" .../>
<Border x:Name="ValidationErrorElement" ...>
<ToolTipService.ToolTip>
<ToolTip x:Name="validationTooltip" ...>
<ToolTip.Triggers> ...
</ToolTip.Triggers>
</ToolTip>
</ToolTipService.ToolTip>
<Grid ...>
<Path .../>
<Path .../>
</Grid>
</Border>
</Grid>
親眼印證理論很有趣吧!
Comments
Be the first to post a comment